BEFORE YOU START:
INGREDIENTS:
1 Linux server (it can be old and not-so powerful)
1 ATA (analog telephone adapter)*
1 or more phone handsets**
1 router with 2 free ports (for your Asterisk server and your analog telephone adapter)
1 google voice account that you don't typically log into for gmail or chatting
*For purposes of this guide, I suggest using the Grandstream HandyTone HT286
**I didn't have a home phone before I did this so I snagged a 3-handset answering system
WHAT YOU WILL GET:
When you are done, you will have a phone that acts like a phone and can call any number in the US and Canda for free or international numbers for pocket change. You will receive calls to your google voice number on your phone. You will get incoming phone numbers in your caller id, but you won't get names without a little extra work. This is because the phone company provides this to you by querying their database.
You can take some extra steps so your Asterisk server has its own caller id database built from your google contacts, but that is outside the scope of this guide. Many modern handsets (like mine) can check your stored contacts and show the associated names when those people call, so this wasn't a big enough deal to warrant the extra work for me.
WHAT YOU WON'T GET:
911 service! Also, there is no guarantee Google will keep this free forever. You also don't get some kludged-together solution where you have to use NAT-traversal or punch holes in your firewall with open ports since this uses native capabilities of Asterisk. Because this method uses Asterisk by itself, you don't need FreePBX, PIAF (PBX In A Flash), or any other unnecessary extra software.
THE BIG PICTURE (literally):

HOWTO:
1.Set up Asterisk (AKA, the bulk of the work):
Make sure you have a Debian or Ubuntu computer with a static IP address. You can set up a static IP in /etc/network/interfaces. I would guess you can use Red Hat-like distros, but some of the locations, required packages, and commands may be a bit different so only go this route if you know what you are doing. Also, stick to the darn guide. If you try to get clever and just use the Asterisk package for your distro, it will be horribly outdated and not contain the functionality to do what you want. You really need to compile it yourself until Asterisk 1.8+ is included in your Linux distribution.
1A.On your Linux box, follow the guide here but don't do step 5 or 6 since those are changes for devices with ARM processors, and I assume you are just using a standard non-ARM computer here. Also, you don't have to install the second list of packages for FreePBX since you won't need it. Note that your packages may be slightly different versions than those listed. For example, on my Debian Squeeze system I found that the package libmysqlclient15-dev was now version 16. Also, the forum thread in the next step (1B) talks about configuring only the minimum modules needed to run Asterisk, so you may want to reference it later if you need to tune Asterisk for very crappy hardware, but don't worry about that until you get it working.
1B.Next, go to this post and do steps 2-5 since you already did step 1. If you have a different ATA (analog telephone adapter) from what I suggested, then you will need to enter the configuration information as shown in step 6 and configure it on your own.
If you don't see a listing in Google Voice's Settings->Phones for your Google Chat account, then you need to first fire up gmail and dial a call with Google chat. It should show up then.
1C.After you finish up that guide, you will need to make some quick additional changes to conquer two issues I encountered. As root, open /etc/asterisk/extensions.conf and add the following lines just after "exten => you@gmail.com, n,Set(CALLERID(name)=${DB(cidname/${CALLERID(num)})})".
Then restart your Asterisk server as root by executing /etc/init.d/asterisk restart.
The first new line rips the + sign off of incoming numbers so your phone's callerid will be able to handle them properly. For example, my handset would show the number, but I couldn't return a call to a missed incoming call from my call log menu on the handset because it didn't recognize the +1-555-5555 format as a valid phone number. This fixes such issues.
The other three lines let Asterisk pick up the phone while it is ringing, make it wait a very brief period, and then it sends a "1" tone to Google. If you don't do something like this, incoming calls will be preceded by a message saying "Please press 1 to accept the call..." even if all such options are disabled on google voice. Worse, pressing 1 didn't work for answering these calls. If you don't want your phone to pick up calls when you don't answer, then you will need to do something a little different by having asterisk send 1 when you pick up a line based on the other method described here.
2. ATA Setup
2A.Grab your shiny new Handytone box, and connect it to power, ethernet, and your phone. The manual for it is found here.
Pick up your handset and dial ***. Then dial "01" to hear your IP address mode and 9 to toggle between dynamic and static. I highly recommend a static IP. After toggling to static, hit * to hear a readout of the Handytone's current IP address. You can enter in a new one by typing 12 digits on the keypad (including any zero values). You may need to reboot it after that. You can do so by typing #, then 99, then 9. After that, you can use a web browser on a computer connected to your router to access the web interface at the IP address you specified.
2B.On the web interface, type the default password "admin".
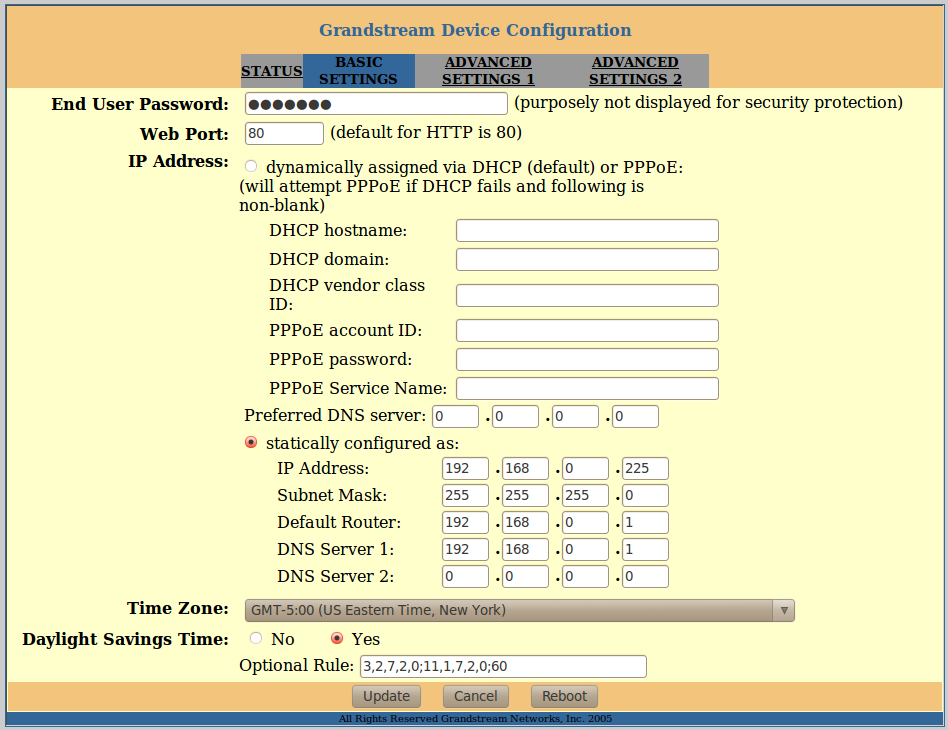
Click "basic settings" and enter an end-user password other than the default "123", then set the static configuration options making sure the IP is set to what you requested, and that subnet mask matches your router's (usually 255.255.255.0), and default router and DNS settings match your router's IP address for most users. Also, set up your time info, and US folks in areas with DST should replace the Optional Rule with "3,2,7,2,0;11,1,7,2,0;60" so it follows the newer DST rules instead of the old ones preloaded on the device. This will matter if you have a handset that resets its display time from the incoming line when you receive a call (as mine does). Click "Update" when finished.
Click "advanced settings 1" and enter a new admin password in the first box (which you will use to login to the web interface in the future), your Asterix server's IP in the second and third boxes, and "101" in boxes 4 and 5. If any STUN server options are turned on, deactivate them. You can also fool around with the codec choices if you like. I believe that the highest numbered G### options are the better ones. Then click update (leaving all other settings alone on this page), and then click reboot.

No changes are needed on Advanced Settings 2. If all goes well, after the reboot you can click status and see "Registered: Yes", and your Handytone won't flash red through the button on top intermittently. Now make some calls and get some calls to try it out. For me it is rock-solid stable even for 1hour+ teleconferences, and my Handy-tone is even plugged into a wireless network bridge
After writing this, I figured out how to set your home area code as described here so you can dial local numbers with only seven digits. Feel free to leave some comments praising me or asking for help.

