Saturday, October 15, 2016

Google Music Plex Plugin on Linux

The wife and I use our Rokus for media consumption on the TVs in our house, and as cord cutters we wanted to be able to access South Park episodes and Google Music recently through the Roku. The way to do that is with plug-ins on your plex server streaming to your Roku. You can get the South Park plugin easily through the Plex channel area. The Google Music plug in is a community deal with multiple versions floating around out there. I tried both, and neither worked for me out of the box as of October 14, 2016 on Linux Mint 17 (analogous to Ubuntu 14.04  Trusty Tahr)

Background:
The two variations of this plugin are by jwdempsey (last commit 9bea5fb Apr 1, 2015)and pablorusso (last commit d8145ee Sep 13, 2016).

The jwdempsey version doesn't currently work with google play music because of some auth changes I believe, so in the web interface to plex it will show you messages such as "This Channel is Not Responding" and have a message in the plugin log saying "raise NotLoggedIn" even if you put in the right credentials.

The pablorusso version has enhancements to handle this, but at the time of this writing his version only worked for Windows because Pablo stated that there wasn't an updated version of pycryptodomex binaries for Linux or MacOS [source].

Luckily, using the pablorusso plugin version and by compiling pycryptodomex to get the required shared object library files using instructions found here, I was able to get everything working.

Solution (Linux):
  1. Go to your plugin directory
    1. cd /var/lib/plexmediaserver/Library/Application\ Support/Plex\ Media\ Server/Plug-ins/
  2. Pull down (clone) a copy of pablorusso's plex plugin using git which you will have to have installed on your system
    1. git clone https://github.com/pablorusso/GoogleMusic.bundle.git
  3. Go to a different directory like your home directory and create a new subdirectory there to download and compile the python Cryptodomex package
    1. cd ~
    2. mkdir pycryptodomex
    3. cd pycryptodomex
    4. wget https://pypi.python.org/packages/67/9a/a9b49b2225af75bab5328b987f5cf3fd73306188b9272bd69bcf8c57ef04/pycryptodomex-3.4.2.tar.gz#md5=5f58848b35a8362d9ebc0f94bd8cc5e7
      1. this is just the URL from the latest verison of pycryptodomex on pypi 
    5. tar xzvf pycryptodomex*.tar.gz #decompress it
    6. cd pycryptodomex-*/
    7. python setup.py build            # compile it
    8. cd build/lib.linux-x86_64-2.7/Cryptodome/Cipher   
    9. cp *.so /var/lib/plexmediaserver/Library/Application\ Support/Plex\ Media\ Server/Plug-ins/GoogleMusic.bundle/Contents/Libraries/Shared/Cryptodome/Cipher/
    10. cd ../Util/
    11. cp *.so /var/lib/plexmediaserver/Library/Application\ Support/Plex\ Media\ Server/Plug-ins/GoogleMusic.bundle/Contents/Libraries/Shared/Cryptodome/Util/
    12. cd ../Hash/
    13. cp *.so /var/lib/plexmediaserver/Library/Application\ Support/Plex\ Media\ Server/Plug-ins/GoogleMusic.bundle/Contents/Libraries/Shared/Cryptodome/Hash/
  4. Lastly we'll need to adjust the ownership of the files so that Plex can use the plugin
    1. cd /var/lib/plexmediaserver/Library/Application\ Support/Plex\ Media\ Server/Plug-ins/
    2. chown -R plex:plex GoogleMusic.bundle
Now you should have the plugin working in Plex. Enjoy.

Thursday, December 3, 2015

Dual boot Linux and Windows 10 with UEFI

Problem:
I have had issues in the past trying to get Windows 8+ to coexist with Linux Mint on a machine with UEFI.

Solution:
The following steps worked for me on an Asus q400a laptop.

  1. BIOS has CSM on and fastboot off
  2. Within Linux I used gparted to format a USB stick with a GPT partition table as fat32. Then I opened the ISO file for the windows installer and copied all the files onto the USB stick.
  3. I caught the bios with f2 and move up the boot device for UEFI: My_USB_stick (it was ADATA in my case)
  4. I installed Windows and then subsequently upgraded to Windows 10 which is still currently free for 7 and higher users.
  5. Shrink the drive for Windows 10 to free up some spare space. The Linux installer I used was not aware of the Windows 10 installation so it couldn't shrink it for me.
  6. Using the same GPT partition table USB stick, delete all the files from it and then extract the files from your Linux ISO onto it. 
  7. Windows 10 made it so I couldn't get to the bios, so I used the instructions here to go into troubleshooting mode
  8. Once in the BIOS, I again selected the UEFI: My_USB_stick and ran the Linux live installer.
  9. In the installer I selected the "do something else" partitioning option and created a primary ext4 root mount "/" using all but 8GB of free space (the amount of my RAM). I then created a logical swap partition containing the rest. I also set the device to "use as bootloader" to the EFI partition Windows had created.
  10. I rebooted and grub popped up letting me pick my OS as I see fit.
  11. Just to be as "secure" as possible, I disabled CSM in the bios so only UEFI is allowed. The only thing this seemed to change is that I get the windows loading circle below the ASUS logo as it launches Windows 10.

Missing windows key sticker

Problem:
I wiped my OEM installed copy of windows from my ASUS laptop (to install Linux) and deleted the recovery partition. Also, the key is missing because it rubbed of the sticker. I wanted to put Windows on in addition to Linux.

Solution:

  1. Use Linux to extract the key from your laptop firmware. It's still in there, and that is how the OEM disk gets it when you re-install. It just takes a single command run as root to get at it. With that key you can then install a generic copy of Windows which you can get from Microsoft. So either boot up linux on the computer or run it from a live disk (no install required).  Then run sudo hd /sys/firmware/acpi/tables/MSDM
  2. Next go and download the installer for your version of Windows. In my case I needed windows 8. This could get into a bunch of other issues since the installer I could get from MS is really an 8.1 installer which may not take my 8 OEM key. The solution in that case may be to install with a generic key first and then swap in my OEM key. The subject is well explained in this reddit post. I lucked out though, and it picked up my OEM key no problem (this may have been because I upgraded to 8.1 at some point in the past).
  3. Now install and enjoy.
  4. And if you are still in the Win 7 or 8 upgrade window, maybe consider upgrading to Windows 10.

Wednesday, April 8, 2015

HOWTO: GIT Subtree Merge

This one is a quickie. If you need to merge the contents of one git repository as a subdirectory of another project, you can use this strategy.

Saturday, March 28, 2015

HOWTO: Set up an awesome OTA DVR [Tablo]

I am nearing the end of my contract with Dish, and I have finally convinced my wife to get on board with getting rid of traditional TV for good. There are a lot of ways to go about this with various products and streaming services. We ultimately decided to use Amazon Prime (which we already use for shipping benefits), Netflix, HBO Now (after the Apple lock-in ends), and a DVR system for over the air (OTA) TV.

The over-the-air DVR was a necessary to avoid paying for pricey series which could be obtained for no cost beyond that of the system used to acquire and record antenna signals. I mean, they are literaly in the air around us. For example, the first season of the Flash was almost $40 on Amazon when I checked. We also wanted iZombie, The Blacklist, Grimm, Last Man On Earth, Front Line, and Law & Order SVU, 60 Minutes.

I initially tried out a roll-my-own system with MythTV and the hdhomerun connect tuner, but it proved to be a painful setup. That tuner also sent a large mpeg2 stream to the MythTV backend for recording which had to either be transcoded after recording or on-the-fly by the Plex software I used to serve it up to my streaming devices. The problem was that my hardware was not powerful enough to support recording and transcoding too much at once, and it led to choppy playback. On top of that, I wanted something a little simpler to manage that would work with my Roku 3 and Fire TV Stick (and my Chromecasts to a lesser extent).

Anyway, it turned out better than my satellite DVR in many ways, and I would like to spread this information so people can enjoy such an awesome device and awesome savings. One thing to note is that you will want to factor in the cost of the program information in the electronic program guide (EPG). While the device can do timed recordings without it, it really makes the Tablo shine as far as finding content and making the unit easy of use. The folks at Tablo currently charge either $5/mo, $50/yr, or $150/lifetime (your lifetime, not tied to the device) for such subscriptions. These subscriptions are pretty standard and can be found with alternatives like MythTV, Simple.TV, or Tivo's devices. For me this wasn't a huge deal since even the lifetime subscription was only twenty bucks more than my highest ever satellite bill towards the end of a two-year contract (with HBO).

The Antenna


Initially I tried a little flat AVANTEK antenna similar to the popular Mohu Leaf after antenna websites recommended that something this was all I really needed. While these may work well for many other folks in many situations, it came up short for me even when I mounted it in the attic. It picked up very few channels perfectly, and it was missing ABC entirely. Also, I had intermittent distortion which may be related to living near an airport under a flight path.

I did a lot of research after that, and eventually settled on the affordable RCA ANT751with a run of quad shielded which I got in a two pack of 25 ft lengths from Cable Matters to reduce signal loss and interference. After I mounted it in the attic (which is where I had my previous flat antenna) I went from 10 channels to 53. 

Antenna Installation

In preparation for selecting your antenna and aiming it if it is directional, websites like TV Fool or Antenna Web can be very helpful. Specifically for aiming, TV Fool's signal locator tool can provide the appropriate heading of where to point your antenna for the best results. The term for this directional heading given in degrees is azimuth.  Then take the azimuth value and punch it into a free aiming app. Antenna Pointer for Android was quick, free, and easy to use for this.

In my case, my antenna required some assembly as far as unfolding some of the poles on the mast, attaching end caps on the mast, putting together the base, attaching a transformer with the coaxial output.

After reading about the importance of mounting your antenna as high as possible for avoiding obstacles and receiving a clear signal, I mounted the base high up one of the structural beams under my roof with some screws placed into pilot holes drilled into the wood. Then I followed the instructions to make sure the upright tube coming out of the base was level before attaching the antenna mast. While tightening the mast to the upright, I placed my phone flat on top of it with the top of the phone pointed towards the small end of the mast. I nudged the mast left and right and adjusted while tightening watching the azimuth readout in the Antenna Pointer app, and I was reading within a degree of my specified 126 degree azimuth.

The Tablo


That pic is my wall-mounted Tablo in my home's central networking cabinet located in my laundry room. Since it is a network device and not something that attaches directly to the TV, you can stow it somewhere out of the way in contrast to other products like the Channel Master DVR+ devices made to be used directly attached to a TV.

The Tablo is available in a 2-Tuner model or 4-Tuner model with a price difference of around $100 when I purchased mine. I opted for the 4-Tuner version after reading that a tuner is used to transcode video for streaming out over the internet. However, a tuner is not used for streaming recorded content within the home since it is transcoded to a usable format for local streaming at recording time. Aside from the remote streaming scenario, tuners are used while a program is being watched live or recorded.

For storage, you will need to attach your own USB hard drive since the Tablo does not use built-in storage. This means you will need to factor an additional cost if you don't already have an external USB 2 or 3 hard drive which is compatible, but it also means you don't have to crack open the Tablo to replace the hard drive when it fails. The drive failed in my Dish Hopper last year, and I had to wait for them to ship me a new unit to be able to record programs again. In the future, I could just go out and buy a compatible replacement drive. For compatible drives, check their guidelines. In my case, it just so happened I had a compatible spare WD Elements 2 TB USB 2.0 Desktop External Hard Drive laying around.

Anyway, you need to connect the Tablo wirelessly or via ethernet. I would strongly recommend ethernet for something making such heavy use of the network to serve up streaming content. On that note, you will need to have a good quality home network for streaming around the house and out to the Internet in general. I recently upgraded from an old Linksys E2500  to a NETGEAR Nighthawk R7000, and it easily handles the streaming. If you were considering an upgrade to a newer router like those supporting 802.11ac, this would be an ideal time.

Per the manufacturer, you will need to connect it to the same router or network segment used to connect to the Internet. I initially attempted to connect it to a switch connected to my router, but it did not work.

After connecting to the network, attaching the storage, and connecting the coaxial from the antenna it is ready for power! Connect the power cable and turn it on. You should see the port on the router light up orange. You can continue the configuration with their mobile apps, or just use a computer like I did. Go to mytablo.tv and it will walk you through formatting the drive, scanning for channels and downloading the channel guide data, enabling remote streaming (very easy since it configured port forwarding automatically via UPnP on your router), and updating the firmware. The firmware updates showed me a changelog with significant enhancements, so you really will want to update it.

During my inital setup, mine got stuck at "Downloading" during the firmware update at 0%. I waited five hours hoping it would work itself out and not wanting to brick it, but then I found a relevant community post describing how a reset could resolve it, and I decided to go for it. It came back up on the old firmware just fine. After that, everything worked normally and I was then able to update it later.

From there, the OTA world is your oyster. You can now watch live or recorded programs on your smartphone, Chromecast, PC, or Roku (the newer the better). The folks behind the Tablo should be finishing up with the redesign of their Roku channel, and an app for Amazon Fire TV products (including the stick) is also forthcoming. It was supposed to come out in Q1 2015, so the schedule must have slipped. That beta interface they are demoing is like a virtual Cable/Satellite DVR right on your existing streaming devices.

As it is now, adding and finding shows and movies for recording is dead easy. You can search for shows or movies. You can see available airings organized by genre, prime time, etc. You can see information for airings, record all or only-new, and pick and choose specific episodes to record or not. Guide data is only available for 14 days out so a series cannot be added if it is not airing within that time period.

Anyway, welcome to the future fellow cord cutter.

Sunday, February 22, 2015

Customize splash screen on Kenwood DDX7701HD, DDX8901HD, and DDX7071BT

Problem:
I want to customize the boot up/splash screen on my Kenwood car stereo to something a little more vehicle-specific than the default startup screen. I couldn't find specific instructions for my headunit model, but there was information for similar models. I have the DDX7701HD, but the other models listed in the title are very similar and use the same manual, so they should be able to use the same method.

Solution:

  1. Prepare the files:
    1. Format a USB drive as fat32 
    2. On the USB stick, save a bitmap image of 800x480 pixels with 16-bit full color and RGB color settings of R5,G6,B5 (a free program like Gimp can do this if you choose File > Export As > select BMP > Save (a dialog will pop up after you hit save) > Advanced > Select R5 G6 B5 under the 16-bit heading 
    3. On the USB stick, create a text file named OpeningCustomize.txt containing the text shown here
      1. This file must be created using Notepad. Linux-style line returns will not work.
      2. Make sure to change your_file_name.bmp to your actual bitmap image file name.
  2. Prepare the stereo:
    1. If you don't want to lose your settings, back them up in the Setup -> System -> Setup Memory menu.
    2. Get a paperclip ready to press the reset button (red lighted triangle on lower left corner)
  3. Perform the customization:
    1. With the stereo on, press the volume down and menu buttons (you will keep holding these two only), and quickly press the reset button.
    2. The stereo will power off and then turn back on. Release the volume down and menu buttons only after the buttons on the bezel illuminate
    3. When the customization menu appears, plug the USB drive into the USB port connected to the stereo's USB cable.
    4. Touch the button labeled "Opening Customize" and it will say "Customization OK"
    5. Now power the unit off and on via the Menu/Power button, and it should come up with your new splash screen

Monday, November 17, 2014

[REVIEW] Life With the Jawbone UP24

This is my review of the UP 24. This is not a problem/solution post like I generally put on here.

I have been using the UP 24 for a little over a month now, and I really like it. Below I'll discuss my opinions of the features.

Workout/activity feature

This gives you a way to start and stop tracking before and after a workout and then later specify what the activity was to get a better calorie burn estimate.

Calibration

This lets you set the UP to a more exact estimate of distance by using the activity tracking feature for a walk of known distance and then telling the up what the actual distance was after you are finished. After doing this, I saw about a 20% decrease in distance so this may be important for other tall folks like myself.

Food tracking

I haven't used the built-in food tracking, but the integration with My Fitness Pal is really solid. The up can update your totals in MFP and add extra exercise calories for you to know when you have more room to feast that day. Your food gets imported into the built-in food tracking so you can get tips and advice about your diet there.

Running

This is not really a running tracker by itself, but I'm happy to report that it integrates really well with other services and (indirectly) devices. There is integration with Runkeeper, Strava, and MapMyFitness to name a few. I used to use a smartphone with Runkeeper to track my runs, but I moved to using a Garmin Forerunner 110 GPS Watch with Heart Rate Monitor which is one of the cheaper heart-rate chest strap/GPS watches I found at the time.  The way I sync is by uploading from the Forerunner to MapMyFitness (through their site with the Garmin Express browser plugin). MapMyFitness syncs with the UP and feeds in my workout data so the UP knows that all the steps during a certain time were really part of this run which has a presumably more accurate calorie burn estimate with GPS/HR data than steps alone. This activity then generates calories adjustments in my food tracker app of choice (via Up Integration). In this sort of setup, it is important to connect each app to up without connecting them to each other to avoid double counts such as Map My Fitness -> UP -> My Fitness Pal and  Map My Fitness -> My Fitness Pal counting the same exercise.

I do wish I had a GPS watch with bluetooth so it could automatically upload to my phone rather than having to go sit at my desktop, but that is not a failing of the UP. In fact, I notice it so much because the UP quietly syncs all the time via its low power bluetooth. When you track runs through a third-party app, you don't have to start/stop the activity timer on the up. I wear it to keep my step count accurate, but it just passively monitors and then gets updated with the activity.

Sleep

The up can track your sleep pretty nicely. It will show you when you are up, in deep sleep, or in light sleep. They claim the MotionX tech allows it to be about 95% as accurate as a professional sleep study in this regard because it was calibrated against actual sleep study data. I thought this was pretty cool before I got it, but now I would say it alone may justify buying the UP 24. It makes you very aware of how much or little you are sleeping AND the quality of that sleep. Seeing a graph of your actual deep/light sleep time is infinitely more useful than just asking yourself if you feel tired or awake that day. It allows you to know when your sleep is bad so you can make some adjustments to your exercise, bedtime, eating, or caffeine.

To activate this feature, you just hold the button until the moon lights up on the band. When you wake up, just hold it down again. The Caffeine app allows you to track your caffeine consumption and can advise you on intake based on how it impacts your sleep. This app does not yet exist for Android, but it is on iPhone.

You set a goal for nightly sleep, and the app will tell you what percentage of that goal was achieved.

Smart Alarm

This feature allows the band will vibrate to wake you within a certain number of minutes of some time that you set in order to wake you up when you are at a lighter point in your sleep cycle. This supposedly leaves you feeling more refreshed. You set the time range and the wake up target time. You also set the days of the week this alarm should fire. I use this instead of a regular alarm clock now, and my waking is usually more pleasant. 

Power Nap

This allows you to take a short nap and get woken up by vibration. To activate, you tap and then hold the button until it lights up.

Step Tracking

The step tracking seems fairly accurate, and it displays the frequency of your steps in periods throughout the day as a graph of yellow to red bars on a histogram. It shows you percentage of your goal steps and lets you know when you are on a multiday streak of meeting your goals which can be motivating.

Charging

It uses a customized USB cable with a headphone adapter to charge. It charges very quickly, and can run for about 15 days maximum. I usually charge it one or two mornings a week while I shower.

Activity Feed

The app will give you tailored recommendations and tips based on sleep, food intake, and exercise. So far, it has pointed me to some pretty good information about running techniques, diet, and general health.

Conclusion

I've been quite happy with the UP, and I would recommend it.

Monday, September 29, 2014

Expanding a KVM guest disk without LVM!

I recently ran out of space on my primary home server kernel virtual machine (Linux Mint) because I created the disk with a paltry 20G of space. To remedy this, I decided to add 30 additional gigabytes. The following are the steps I took.

Note that step 4 is potentially dangerous (specifically deleting and then re-creating the root partition), and setting the system up with LVM would have prevented me having to do it but if you are following this guide you are in the same situation and can't really benefit from could have/should have thoughts. :-) Anyway, everything worked fine when I was done.

  1. Shut down the guest (on host)
    1. virsh -connect qemu:///system
    2. shutdown your-guest-domain-name
  2. Expand virtual disk (on host)
    1. qemu-img resize guest-disk.img +30G
  3. Restart virtual machine (on host)
    1. virsh -connect qemu:///system
    2. start your-guest-domain-name
  4. Expand ext4 partition and filesystem on bare disk (on the guest)
    1. I followed this guide to the letter to resize the root os partition, reboot, and then expand the filesystem


Jawbone UP24 App Crashing After Personalization

Recently I got a nice large persimmon Jawbone UP 24 after seeing how useful my wife's was for fitness and sleep tracking, and the persimmon color is pretty cheap and looks good on either sex. Unfortunately, I was very frustrated trying to get it to work with my Android-based Oneplus One due to app issues preventing me from completing the setup. After lots of trial and error, I finally figured out an odd set of steps that got it working:


  1. If you haven't signed up for an account already, sign-up in the app. During signup the app may become non-responsive and crash. This is fine.
  2. Now sign-up again with the same account information and uncheck the e-mail notifications before proceeding. If you are getting a message about the account already existing, something is different than what I ran into and my solution probably won't work.
  3. When you hit next/okay at this point it may just return you to the e-mail/password screen. Keep at it, eventually it will move on. I theorize that something at this stage causes the problem to be resolved.
  4. Run through personalization, and you will be rewarded by it completing successfully.


Thursday, September 4, 2014

RDP broken on Linux Mint (possibly after upgrading)

Background:
I am a fan of SSH of course, but RDP is pretty rock solid and easy to set up for remote desktop sessions and has given me a lot less trouble than nomachine setup that I used to use.

Problem
You used to have nice RDP sessions to your Linux server with xrdp. However, suddenly you get to a grey or checkerboard screen with an X for your cursor that never goes away after entering your login credentials. I encountered this after I took my main home server virtual machine from Mint 14 to Mint 17 in a single step.

Solution:
Specify the use of a mate session (if using mate) rather than an X11 session as described in this forum post.

Monday, February 10, 2014

nvidia-settings don't load on reboot

UPDATE:
This seems to no longer fix the problem for me lately after an upgrade to Mint 17, and I'm unsure why.

Problem: 

You are using an Ubuntu/Mint/Debian with an Nvidia driver (or perhaps another proprietary GPU driver), and your custom resolutions are lost at each restart even though you applied them and saved to xorg.conf. This frustrates you to no end, and even if you script a live modeline change putting your box to sleep or a reboot will mean it doesn't get automatically reapplied. Also, your settings don't get reloaded into the settings GUI after a reboot, and you are mystified.

Explanation: 
The built-in Mint Preferences > Displays tool doesn't give a crap about your custom configuration, and it will reload whatever it had set previously just to torture you. You can kill it with fire though. To see if it has a settings file look for a ~/.config/monitors.xml file.

Solution:
You may not need the first four steps, or you may have already performed them.

  1. sudo nvidia-xconfig    # create a fresh xorg.conf
  2. gksudo nvidia-settings # set it up like you wanted it; my overscan fix example
  3. Click "apply"
  4. Click "save to x-config file"
  5. rm ~/.config/monitors.xml  # get rid of the non-xorg Displays configuration
  6. restart
I have seen this problem again and again on forums where nobody knew that deleting that file would fix the problems. Spread the word my friends.

Wednesday, December 18, 2013

Apt-get behind a corporate proxy: A tale of Ironport, 401 errors, and NTLM

Problem:
I was trying to fetch packages via aptitude and apt-get, but I would get "ign" or "401 Authorization Required" when attempting it.  I knew we had a proxy set up and figured out where it was. I tried all the advice to use user:pass@domain as the http_proxy value directly to no avail, but NTLM was the way to get out in our Windows oriented shop. Oddly, wget would work to download the package indexes, but apt-get could not.


Solution:
A tool called cntlm creates a little proxy at a specified port on your box which handles authentication with the real proxy. I found a good guide here* for how to set it up, but see my notes and added clarification about the config parameters below. Keep in mind that there will be trial and error if you have an uncooperative network security team in your organization. I had to figure out where the proxy was, the port to use, and masquerade the server as my desktop workstation to get it all going. Good luck, and don't give up. Once you get the settings right, this works flawlessly.

Parameters in /etc/cntlm.conf:
    1. username - Active Directory username
    2. domain - Active Directory domain
    3. workstation - Name of the workstation (feel free to spoof this to that of another machine, NTLM can't stop you)
    4. proxy - the ip:port of the proxy
    5. listen - the local port to use for relaying your traffic 
* Note that the value in the -M parameter value in "cntlm -H -M" had to be something other than the proxy itself (eg http://test.com) in order to work for me.

* Note that the guide I linked shows two separate hashes for the password (PassNT and PassLM), but you may only get one with NTLMv2 (PassNTLMv2) as shown at the bottom of the cntlm page. This is fine, and just paste that one line into your /etc/cntlm.conf.

Sunday, July 7, 2013

Linux Mint Overscan Woes

I fired up Linux Mint 15 because my Ubuntu distribution was looking a bit dated, and it had developed an overscan problem where the edges of the screen went off the monitor. I am using an nvidia graphics card with nvidia drivers.

Problem: 
The overscan was all screwed up on my 23 inch Hannspree monitor. It was listed as device DFP-1, and no resolution I could use in the nvidia-settings GUI menu would resolve the problem.

Solution: 
I needed to set a metamode to fix the overscan. I headed over to this page, and the metamode suggested worked perfectly with "DFP-0" altered to
"DFP-1."

DFP-0: 1920x1080 { ViewPortOut=1820x1020+50+30, ViewPortIn=1920x1080 } 


  1. sudo nvidia-xconfig
  2. gksudo nvidia-settings

Then plug your custom resolution configuration into nvidia-settings like so. Note that I had to manually select the 1920x1080 resolution or the settings below it wouldn't work right:


After that, hit apply. Then click save to X configuration file.

If you lose your settings after a restart, then you may be experiencing a problem that plagued me for a long time. My solution is HERE.

Thursday, December 20, 2012

Simple KVM Server Virtualization

I want to virtualize a server from scratch. I have a server in mind already, but I don't want to bother with virtualizing it directly since it is running on a dated OS.  I figure I will build a new VM in parallel on some spare hardware and then migrate the image over to my beast server. Some key benefits of this are that I can use some of the spare capacity of that beast server to test out other server operating systems and software in parallel with my main server.  Also, I can install crashplan on the host itself and have it backup my server images for painless offsite backup whereas now I really don't have a backup of the physical server configs.

This guide will be devided into three stages as follows because this is the order I carried out the steps in.

  1. Set up a host CENTOS 6.3 server
  2. Set up a guest MINT 14 server (with MATE desktop)
  3. Set up a static bridged network and configure our VM to use it

1.Setting up host server

First thing, you should make sure your processor supports kvm virtualization. Install CENTOS 6.3 or later. I am not a redhat/centos guy for most of my home Linux systems, but it seems ideal for a VM host where I don't really need the latest and greatest packages and stability and concise configuration are key. I am assuming you can install this on your own with the graphical installer or however.

Now, we will need some special tools to get virtualization running.  As root, do the following on your fresh CENTOS box:

# I recommend you update your box first, this may take a while
yum update

# get the core virtualization pieces
yum groupinstall Virtualization "Virtualization Client" "Virtualization Platform" "Virtualization Tools"

# install and turn on the avahi daemon
yum install avahi
service avahi-daemon start
chkconfig avahi-daemon on

# I ran into this not being on.  The virt-manager just sat there trying to connect before I did this.
service libvirtd start
chkconfig libvirtd on

That's it, you are ready to virtualize!  Some people say you need to deactivate SELINUX, but some say it isn't needed.  You can do so by editing /etc/selinux/config if you think it is causing you troubles.

2.Setting up a guest server

This is pretty straight forward (except for the last little bit where we correct some video settings). Download  an ISO and/or burn it to a CD for the OS you want to install. In this example, I am using Linux Mint 14 with MATE desktop.

Open up the KVM manager tool you installed in step 1.


In the top left click play button on a monitor that says "Create a new virtual machine" when you hover over it.  Then, on the step 1 window name your server and pick ISO/CDROM.


On the step 2 windows, tell it where the ISO/CD is.  For OS type, just use Linux.  For version, go to "see all" and select the latest kernel available as shown.  The OS being installed is so far ahead (3.x) kernel, that there is no more up-to-date choice that I can tell.


On the step 3 window, set up your memory (give Mint 14 at least a gig) and select how many cores to set. There are ways to alter this later if you need to, so don't get too hung up on getting this just right now.  In my case, the host has too few cores and too little memory to set it up like I will after I migrate it to something more powerful.  


On the step 4 window, set up your storage. The default 8GB is probably a bit tight, 20GB+ may be better. After taking this screenshot, I chose 40GB. You don't have to "allocate entire disk now." I say let it grow dynamically.


On the step 5 window, review your selections and then hit finish.  If you carried out the final section of this guide before doing the VM setup, you could expand the Advanced options and choose your network now. However, I am trying to break this into quick chunks for time-crunched people like myself and getting your VM up feels like progress ;-).


Now launch your VM and install the OS as you would on a physical machine (except maybe more slowly and less responsively) in the window that pops up.  The blue "i" icon on the VM popup window (next to the terminal icon) will show you system stats and you can change things here.

I had an issue where every time I logged in, I got bounced back out.  To fix it, I had to do two things.  I did these out of order, so I don't know if they were both necessary.  I will share them in the opposite order I did them. If the first step works for you, don't bother with the second.

First, switch the virtual video adapter from cirrus to vga.


If you still can't login to the VM gui, then carry out this second part. At the login screen to your guest OS:
use the send menu to send ctrl alt f2           # to drop to virtual terminal on VM
login as root
apt-get install nvidia-current
reboot

After it reboots, it should work like a charm. Also, if you want to shut off the GUI later, you can always edit the /etc/inittab to prevent loading the GUI. I like having the option of the GUI on my servers since it really doesn't take up that much disk space and can be disabled as needed.

Your network should be set up fine for using this guest VM like a desktop to go on the internet, get updates, etc as long as your host's network is working right. Out of the box it gives you a virtual network using NAT which is fine for these purposes.  I could reach out to other boxes on my network just fine. The show-stopper for virtualizing a server, is that nothing else on my network can reach out to the VM except its own host.  In the next step, we fix that nonsense.

3.Setting up a bridged network

Okay, this was a bit foreign to me. I have used a wireless network bridge, but I never built a virtual bridge on a box off of a physical NIC before. I am doing something odd here in using a static IP for the bridge itself which nobody seemed to do in their guides, but it is easy enough.

I have to give some credit here as I got started with bridging using information from this site.  I also found a good reference on killing NetworkManager which doesn't play nice with your bridge.  Anyway, here is my condensed version.

As root on the host:

service NetworkManager stop
chkconfig NetworkManager off
chkconfig network on

Clear out any crappy config files you have like /etc/sysconfig/network-scripts/ifcfg-Auto_eth0 that were made by NetworkManager. 

vi /etc/syconfig/network-scripts/ifcfg-eth0   #(this may be different on your system if eth0 isn't your NIC)

DEVICE=eth0
BOOTPROTO=none
ONBOOT=yes
BRIDGE=br0
------------------------
vi /etc/syconfig/network-scripts/ifcfg-br0  # set up your static IP and DNS entries

DEVICE=br0
TYPE=Bridge
BOOTPROTO=static
DNS1=192.168.0.1
DNS2=8.8.8.8
GATEWAY=192.168.0.1
IPADDR=192.168.0.205
NETMASK=255.255.255.0
ONBOOT=yes
DELAY=0
------------------------

Make sure you have DELAY=0 and ONBOOT=yes.  Usually DNS points to your router (gateway) and/or a service like google (8.8.8.8).


vi /etc/sysconfig/iptables  #edit the firewall definititions by adding a line
.....
-A INPUT -i lo -j ACCEPT  # EXISTING LINE
-A INPUT -i br0 -j ACCEPT # ADD LINE SIMILAR TO THE ABOVE EXCEPT CHANGE lo TO br0
.........

service network start  # should give all OK's
service iptables restart  # restart the firewall

Now you need to edit your VM settings. While the VM is off, open it and hit the blue "i" like we did to alter the video adapter. I used device model vertio because it was the default, but there may be merit in some of the other options. Anyway, go to the NIC device and set it up as shown:


Then click apply. Now you can boot up the guest OS and configure its network settings with a normal static IP or even DHCP. It will work just like it is on the network directly using its own NIC.

I hope this guide has been helpful for you. Feel free to offer any tips or improvements or ask questions. Now go forth and virtualize!

Sunday, August 12, 2012

Linux Apache2 Reverse Proxy With SSL Termination and Basic Auth For Sickbeard, Sab, Couchpotato, etc.

I just finished completing one of the hardest home server administration tasks I have ever embarked on, and I thought I would share my efforts since I had to pour through over a boatload of sources to get all the information needed to do it.  If anyone has suggestions on how to improve this, I am all ears so leave a comment.  I used Linux Mint which is very close to Ubuntu so the commands ought to work on it too.

I wanted to get this.  We'll call it option A:

[User]-----HTTPS over Internet----->[Single Login Proxy]----HTTP------>[Web Applications At Home]

It is also trivial then to set up this (Option B) since it only requires the removal of some configuration (comment out the A-only sections labeled in the config files) and then configuring each individual application with a password:

[User]-----HTTPS over Internet----->[No Login Proxy]----HTTP------>[Web Applications At Home]

Ensure you have your applications (Sab, Sickbeard, Couchpotato, etc) running already on their own port and record those port numbers.  Don't bother enabling SSL on any of those individual apps since we are going to handle it on Apache directly and tunnel the LAN HTTP traffic through HTTPS across the net.

Get a domain pointing towards your home IP and an SSL cert (OpenSSL type when the CA asks).  I used NameCheap and got everything (ssl and domain) for under 6 bucks before tax for a .info domain for one year, and they have free dynamic dns service.  You will need to generate a cert signing request on your Linux box to send off to the CA to get your cert, and there are a million guides for this.  You will also need dynamic DNS configured so your domain points to your home IP if it is dymanic and it probably is.  I will document the Dynamic DNS step in more detail in the future for my particular provider but it will be different if you use another service.

Install apache2 with apt-get install apache2. Configure a new site called proxy in /etc/apache2/sites-available with the following contents:

    <VirtualHost *:80>
      ServerName www.mywwwdomain.com
      Redirect permanent / https://www.mywwwdomain.com/
    </VirtualHost>
    <VirtualHost _default_:443>
    ServerName www.mywwwdomain.com
    SSLEngine on
    SSLProxyEngine On
    RequestHeader set Front-End-Https "On"
    ProxyPreserveHost On
    RewriteEngine on
    CacheDisable *
    SSLCipherSuite ALL:!ADH:!EXPORT56:RC4+RSA:+HIGH:+MEDIUM:+LOW:+SSLv2:+EXP:+eNULL
    SSLCertificateFile /local/path/to/certfile.cert
    SSLCertificateKeyFile /local/path/to/certkey.key
    
    ProxyRequests Off
    ProxyPreserveHost off
    
    DocumentRoot /var/www
    <Directory />
    ############ OPTION A ONLY##################
    AuthType Basic
    AuthName "My Homebrew Gateway"
    AuthUserFile /etc/apache2/passwords
    Require user your_login(s)_go_here
    ############# END OPTION A ONLY#############
    SSLRequireSSL
    SSLRequire  %{HTTP_HOST} eq "www.mywwwdomain.com"
    SSLOptions           +FakeBasicAuth +StrictRequire
    SSLRequire           %{SSL_CIPHER_USEKEYSIZE} >= 128
    ErrorDocument 403 https://www.mywwwdomain.com
      Options FollowSymLinks
      AllowOverride None
    </Directory>
    <Directory /var/www/>
    ############ OPTION A ONLY##################
    AuthType Basic
    AuthName "My Homebrew Gateway"
    AuthUserFile /etc/apache2/passwords
    Require user your_login(s)_go_here
    ############# END OPTION A ONLY#############
    SSLRequireSSL
    SSLRequire  %{HTTP_HOST} eq "www.mywwwdomain.com"
    SSLOptions           +FakeBasicAuth +StrictRequire
    SSLRequire           %{SSL_CIPHER_USEKEYSIZE} >= 128
    ErrorDocument 403 https://www.mywwwdomain.com
      Options Indexes FollowSymLinks MultiViews
      AllowOverride All
      Order allow,deny
      allow from all
    </Directory>
    
    <Location /sab>
       ProxyPass http://localhost:8080
       ProxyPassReverse http://localhost:8080
    </Location>
    <Location /couchpotato/>
       ProxyPass http://localhost:8084/couchpotato/
       ProxyPassReverse http://localhost:8084/couchpotato/
    </Location>
    <Location /subsonic>
       ProxyPass http://localhost:4040/subsonic
       ProxyPassReverse http://localhost:4040/subsonic
    </Location>
    <Location /sickbeard/>
       ProxyPass http://localhost:8081/sickbeard/
       ProxyPassReverse http://localhost:8081/sickbeard/
    </Location>
    <Location /manage>
       ProxyPass http://localhost:32400/manage/
       ProxyPassReverse http://localhost:32400/manage/
    </Location>
      RewriteEngine on
      RewriteOptions inherit
    </VirtualHost>
    
    Then set your /etc/apache2/httpd.conf file up like the following:
    ServerName www.mywwwdomain.com
    <Proxy *>
    Order deny,allow
    Allow from all
    ############ Option A Only ###################
    AuthType Basic
    AuthName "My Homebrew Gateway"
    AuthUserFile /etc/apache2/passwords
    Require user your_login(s)_go_here
    ############ End Option A Only #################
    SSLRequireSSL
    SSLRequire  %{HTTP_HOST} eq "www.mywwwdomain.com"
    SSLOptions           +FakeBasicAuth +StrictRequire
    SSLRequire           %{SSL_CIPHER_USEKEYSIZE} >= 128
    ErrorDocument 403 https://www.mywwwdomain.com
    </Proxy>
    

After you have these files in place remove /etc/apache2/sites-enabled/000-default and from within  /etc/apache2/sites-enabled run ln -s ../sites-available/proxy to make a softlink to the proxy site configuration file we just made.
To review the files we just made:

The "option A only" sections deal with basic auth using passwords.  In order to have passwords you will also need to create a password file containing your login/password info using the htpasswd command.  In the example provided, the passwords are stored in /etc/apache2/passwords and you could set this up with htpasswd -c /etc/apache2/passwords your_login.  It will then prompt you for the password.  If you want to enforce use hashed passwords there is an htpasswd option for that.  Basic auth is perfectly secure when used behind SSL encryption as is anything tunneled through an encrypted protocol.  So if anyone tells you different, punch them in the groin and scream like a rabid hyena.

The SSL options ensure https is enforced at specific locations and in general.  The httpd.conf file generally applies these settings, but I wanted to be super-sure that we are getting SSL on the auth in a few places where it didn't happen with the httpd.conf alone.

You should replace www.mywwwdomain.com with your actual internet-accessible domain.  Also, you should replace the your_login(s)_go_here with your actual login names as set up in your htpasswd created file.  There is a "Require group" directive if you want to use that instead.

In the location sections, the references to localhost are because these different applications are all hosted on various ports of the same machine that is acting as the reverse proxy.  If you have your apps on a different machine in your local network, replace localhost with the local static ip address (e.g. 192.168.0.x) for that server.

The location sections set domain subdirectories that proxy to the port numbers transparently.  The reason for doing this instead of something like sickbeard.mywwwdomain.com is because the cheap SSL certs are only licensed to www.mywwwdomain.com and can't do wildcards to match each subdomain.  If you want to drop hundreds of dollars a year on a wildcard cert, knock yourself out.  The method I used lets one cert work for unlimited applications.  Check that your own port numbers are used in the configuration.  Most of mine are probably not the defaults for these apps.

Lastly, we also set up a redirect here so that traffic coming to mywwwdomain.com will get sent to https://www.mywwdomain.com.  From there they may be asked to login (if using option A) and then sent to the landing page.  Also, it is important to know that each subdomain also requires authentication on the proxy if you go straight to them instead of the main landing page which we will make later, but once you are logged in it will not ask again until your browser is restarted.  This Option A authentication is really neat if you are only accessing things on the web, but it can hinder any third party applications you might want to use.  If using webapp-specific phone apps for instance, they will not understand the auth popup.  In those cases, omit or comment out the option a authentication and just turn on passwords on each individual app.  The proxy will still handle SSL for everything so you don't need it on each individual webapp.

None of this is going to work yet.  And we don't want it to yet.  First we need to do some app configuration. Here is the rundown:

Sickbeard will need extra configuration.  Stop sickbeard from running.  If you have a service setup for it this is as easy as service sickbeard stop. Then edit sickbeard's config.ini file and set web_root = /sickbeard with no quotes.  Then start sickbeard back up again.

Sab is already ready.

Couchpotato (V2) needs extra configuration.  If you are not using V2, you are on your own.  It is what I used and I am not going to muck with an older version for your benefit.  Go to settings, check advanced, in general enter "couchpotato" in the Url Base field.  Then restart it.

Subsonic requires additional configuration as well.  Turn subsonic off service subsonic stop.  Open up /usr/bin/subsonic (it is a script not a bin file) and set "SUBSONIC_CONTEXT_PATH=/subsonic".  Turn subsonic back on service subsonic start.  Note that you can't get rid of the login on subsonic.

You might not care about these last two since the above are the big four, but in case you do they are in there.  Of course, comment out any of the location sections in your proxy configuration file for apps you aren't using. 

Plex will work out of the box with the configuration I gave you and it using its default port.

EXtplorer is a web-based file manager.  If you have it configured, it will work with a proxy out of the box.  As far as deploying it though, if you don't already have it setup, DO NOT USE THE DEBIAN PACKAGE FOR IT!!!!  Don't do it!!  It will mess up apache and steel port 80 from it, and there is no documentation on how to configure or use the packaged form of it at this point.  Download the normal zip file for it, and follow this guy's guide.  Chmod the whole extplorer unzipped directory with 777 recursively chmod -R 777 extplorer and then chmod the .htusers.php file with the devil's number (666) like he said.  Also ensure you jack up the upload size and post size to something you can live with.  When you are done with his guide, go and softlink your /extplorer directory from within /var/www using ln -s /path/to/extplorer extplorer.  When you log into it with admin/admin the first time (after we fire up apache) you will also want to change the root directory to something more useful like /mnt or /media (or / if you are bold) depending on what you want to see.  

You need to port forward your server using your router so the outside world can get to it.  Forward 80->80 and 443->443 on your proxy IP.  You should not be doing this without a static IP on your proxy box. 

Finally, you need to fire apache up service apache2 restart.  When you do this, you will see some errors about modules or something telling you to go to the error log /var/logs/apache/error.log.  You will need to use a2enmod to load the modules you need enabled.  When you run it, it will give you a list of what you can turn on.  Turn on the ones it is bitching about and then try to restart apache again.  Eventually it will stop bitching and everything will work if you get the right modules turned on.  You will also probably need to configure the apache init script to restart on reboot with update-rc.d apache2 enable.

Finishing Touches:
We already set up a webroot so you can alter the html files in there and make your own custom landing page at /var/www/index.html.  I highly recommend this instead of having to remember all your subdirectories as your setup grows.  My landing page looks like this:

It is just a bunch of logos (stored in /var/www) linked with relative paths to the various apps.  So use an href="/sickbeard/" as the link for example.

Final thoughts:
If Jerry Springer can have them, so can I.  A nice improvement would be to allow you to access this on your local network without having your traffic redirected to the authentication/ssl domain when you type your.local.proxy.ip/appname/.  It really shouldn't be hard to configure, but I sunk so much time into this I really don't want to mess with it at the moment.  My simple workaround is to add local links to your landing page that use your.local.proxy.ip:app_specific_portnum to access each thing and you will need to append the directory in addition to the port number for some of them.  Here are the ones I needed for my specific port setup 8081/sickbeard, 4040/subsonic, 32400/manage (plex).  The rest worked already.  You won't have to authenticate when using these local addresses, but they aren't accessible to the outside world this way since you are only forwarding ports 80 and 443.  Extplorer is running in apache, so it cannot be worked around like this.  That is fine for me at home since my server serves up files with NFS/SMB locally and that is a much more integrated solution for your local systems anyway.   

Also, I spared you the hassle of setting up SSL on each individual app.  Not that it is difficult for most of those that can do it, but couchpotato (for example) cannot and it is nice to get zero-configuration SSL on each app you add down the road especially when the app didn't even offer it.  

Subsonic is very painful to setup with SSL directly because it uses utterly retarded java keystores that require converting your ssl cert into a pkcs12 type and then running it through some retarded java keystore importer app with a load of retarded flags and retarded options to generate a retarded file that retarded java can retardedly accept.  Then you have to stick options in /usr/bin/subsonic to tell it about that file and how to access it.  

Lastly, I expect some smart ass to say, "Hey, Mr. Sheez.  I noticed that the auth pops up before my browser says it is encrypted https."  Really punk?  Does it?  No, not really.  Your browser might make it look like the authentication is going to happen in plain text.  However, intercept your traffic like a grown-ass man and you'll see that nothing is being sent in non-encrypted http.  If it is, I'll eat my hat.  If not, you'll eat my hat.

Do let me know if anything legitimately needs correction or updating.  If you need clarification on anything I covered, then let me know in the comments.  Don't ask me some random apache question about an unrelated setup because you are too lazy to look it up.  I am not an apache guru in general.  I figured all this out through sheer force of will and shared it out of some twisted sense of altruism toward the reddit usenet community.  Anyway, have fun with this info mateys.  

Monday, August 1, 2011

The Android-based Car Stereos You Can Buy NOW

Move over Parrot Asteroid, there are several android-based dual din car stereos shipping now from Asia.

1.The Easy Rising ES666 is available direct here for under $400 USD.  This device features a fully removable android tablet which can operate all stereo functions and low profile hard controls for when the tablet is undocked.  It has TV tuning, bluetooth, RDS, wifi, 3g, GPS, and DVD.  The included tablet is a nice bonus prize. 


2.If you paid too much for your car, you can snag a Dynavin. It looks like you can get the DVN-E46 for your BMW, but they don't make generic DIN units.  This unit runs android 2.2. 

3.Another Chinese manufacturer is trying to sell a pretty sleek model.  However, I couldn't find anyone reselling this in the US yet, and a 1000 unit minimum order is too rich for my blood.  That said, it is obtainable in bulk so it should be for sale  somewhere.


If you don't mind buying from a no-name Chinese company, you can be one of the first to grab one of these bad boys.  In contrast, the Parrot device is rumored to run a locked-down app store and an older version of android, and God knows when/if it is actually coming out.  I find it odd that major manufacturers are not producing these types of units when the after market is threatened by Ford Sync and the upcoming GM Intellilink systems.

Tuesday, March 15, 2011

HOWTO: Use Google and Asterisk For Free Home Telephone Service

Recently I have been playing around with free VOIP solutions on my cellphone, and they were pretty neat.  However, they had a lot of jitter, dropped calls, and the occasional connection problem.  I wanted something truly stable with excellent call quality for work besides my cellphone.  Well, I have seen the light and found the answer, and it is a system that uses google talk (what you use to make phone calls from gchat) and google voice.  When it is done, you won't know the difference from your old telco, and it will be free.


BEFORE YOU START:

INGREDIENTS:
1 Linux server (it can be old and not-so powerful)
1 ATA (analog telephone adapter)*
1 or more phone handsets**
1 router with 2 free ports (for your Asterisk server and your analog telephone adapter)
1 google voice account that you don't typically log into for gmail or chatting

*For purposes of this guide, I suggest using the Grandstream HandyTone HT286

**I didn't have a home phone before I did this so I snagged a 3-handset answering system which connect through only one unit (as many these days do) and thus avoid any extra work inherent in connecting multiple phones through your existing home phone wiring.

WHAT YOU WILL GET:
When you are done, you will have a phone that acts like a phone and can call any number in the US and Canda for free or international numbers for pocket change.  You will receive calls to your google voice number on your phone.  You will get incoming phone numbers in your caller id, but you won't get names without a little extra work.  This is because the phone company provides this to you by querying their database.

You can take some extra steps so your Asterisk server has its own caller id database built from your google contacts, but that is outside the scope of this guide.  Many modern handsets (like mine) can check your stored contacts and show the associated names when those people call, so this wasn't a big enough deal to warrant the extra work for me.

WHAT YOU WON'T GET:
911 service!  Also, there is no guarantee Google will keep this free forever.  You also don't get some kludged-together solution where you have to use NAT-traversal or punch holes in your firewall with open ports since this uses native capabilities of Asterisk.  Because this method uses Asterisk by itself, you don't need FreePBX, PIAF (PBX In A Flash), or any other unnecessary extra software.


THE BIG PICTURE (literally):


HOWTO:

1.Set up Asterisk (AKA, the bulk of the work):

Make sure you have a Debian or Ubuntu computer with a static IP address.  You can set up a static IP in /etc/network/interfaces.  I would guess you can use Red Hat-like distros, but some of the locations, required packages, and commands may be a bit different so only go this route if you know what you are doing.   Also, stick to the darn guide.  If you try to get clever and just use the Asterisk package for your distro, it will be horribly outdated and not contain the functionality to do what you want.  You really need to compile it yourself until Asterisk 1.8+ is included in your Linux distribution.

1A.On your Linux box, follow the guide here but don't do step 5 or 6 since those are changes for devices with ARM processors, and I assume you are just using a standard non-ARM computer here.  Also, you don't have to install the second list of packages for FreePBX since you won't need it.  Note that your packages may be slightly different versions than those listed.  For example, on my Debian Squeeze system I found that the package libmysqlclient15-dev was now version 16.  Also, the forum thread in the next step (1B) talks about configuring only the minimum modules needed to run Asterisk, so you may want to reference it later if you need to tune Asterisk for very crappy hardware, but don't worry about that until you get it working.

1B.Next, go to this post and do steps 2-5 since you already did step 1. If you have a different ATA (analog telephone adapter) from what I suggested, then you will need to enter the configuration information as shown in step 6 and configure it on your own.

If you don't see a listing in Google Voice's Settings->Phones for your Google Chat account, then you need to first fire up gmail and dial a call with Google chat.  It should show up then.  

1C.After you finish up that guide, you will need to make some quick additional changes to conquer two issues I encountered.  As root, open /etc/asterisk/extensions.conf and add the following lines just after "exten => you@gmail.com, n,Set(CALLERID(name)=${DB(cidname/${CALLERID(num)})})".

Add these lines just after that line (with "you" replaced with your username):


Then restart your Asterisk server as root by executing /etc/init.d/asterisk restart.

The first new line rips the + sign off of incoming numbers so your phone's callerid will be able to handle them properly.  For example, my handset would show the number, but I couldn't return a call to a missed incoming call from my call log menu on the handset because it didn't recognize the +1-555-5555 format as a valid phone number.  This fixes such issues.

The other three lines let Asterisk pick up the phone while it is ringing, make it wait a very brief period, and then it sends a "1" tone to Google.  If you don't do something like this, incoming calls will be preceded by a message saying "Please press 1 to accept the call..." even if all such options are disabled on google voice.  Worse, pressing 1 didn't work for answering these calls.  If you don't want your phone to pick up calls when you don't answer, then you will need to do something a little different by having asterisk send 1 when you pick up a line based on the other method described here.

2. ATA Setup
2A.Grab your shiny new Handytone box, and connect it to power, ethernet, and your phone.  The manual for it is found here.

Pick up your handset and dial ***.  Then dial "01" to hear your IP address mode and 9 to toggle between dynamic and static.  I highly recommend a static IP.  After toggling to static, hit * to hear a readout of the Handytone's current IP address.   You can enter in a new one by typing 12 digits on the keypad (including any zero values).  You may need to reboot it after that.  You can do so by typing #, then 99, then 9.  After that, you can use a web browser on a computer connected to your router to access the web interface at the IP address you specified.

2B.On the web interface, type the default password "admin".

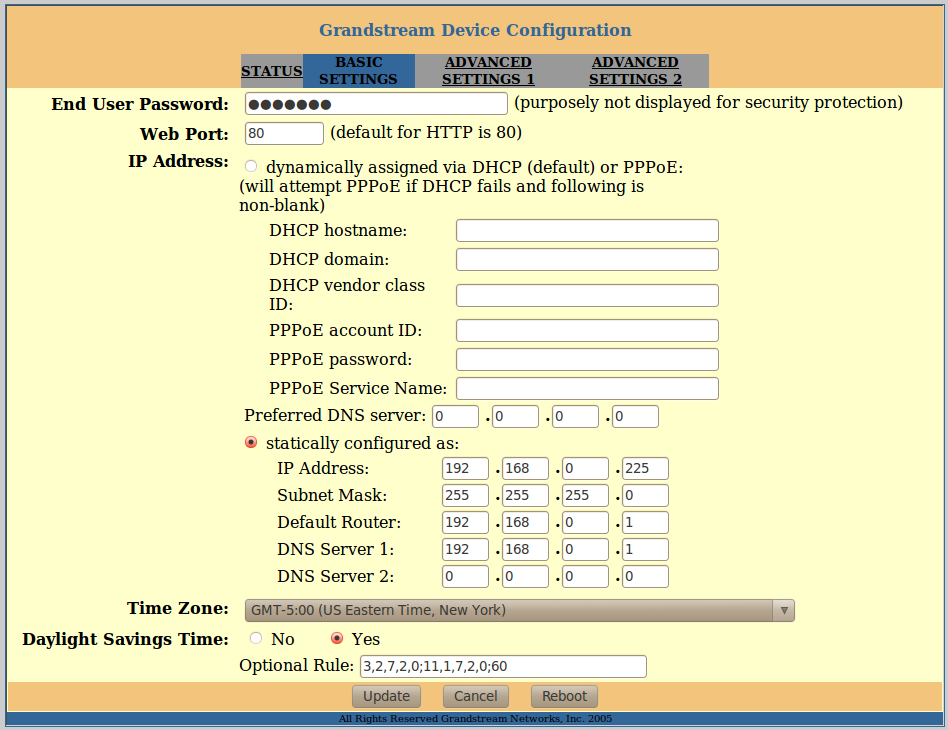
Click "basic settings" and enter an end-user password other than the default "123", then set the static configuration options making sure the IP is set to what you requested, and that subnet mask matches your router's (usually 255.255.255.0), and default router and DNS settings match your router's IP address for most users.  Also, set up your time info, and US folks in areas with DST should replace the Optional Rule with "3,2,7,2,0;11,1,7,2,0;60" so it follows the newer DST rules instead of the old ones preloaded on the device.  This will matter if you have a handset that resets its display time from the incoming line when you receive a call (as mine does).  Click "Update" when finished.


Click "advanced settings 1" and enter a new admin password in the first box (which you will use to login to the web interface in the future), your Asterix server's IP in the second and third boxes, and "101" in boxes 4 and 5.  If any STUN server options are turned on, deactivate them.  You can also fool around with the codec choices if you like.  I believe that the highest numbered G### options are the better ones.  Then click update (leaving all other settings alone on this page), and then click reboot.


No changes are needed on Advanced Settings 2.  If all goes well, after the reboot you can click status and see "Registered: Yes", and your Handytone won't flash red through the button on top intermittently.  Now make some calls and get some calls to try it out.  For me it is rock-solid stable even for 1hour+ teleconferences, and my Handy-tone is even plugged into a wireless network bridge since I was out of router ports.

After writing this, I figured out how to set your home area code as described here so you can dial local numbers with only seven digits.  Feel free to leave some comments praising me or asking for help.