Sunday, August 12, 2012

Linux Apache2 Reverse Proxy With SSL Termination and Basic Auth For Sickbeard, Sab, Couchpotato, etc.

I just finished completing one of the hardest home server administration tasks I have ever embarked on, and I thought I would share my efforts since I had to pour through over a boatload of sources to get all the information needed to do it.  If anyone has suggestions on how to improve this, I am all ears so leave a comment.  I used Linux Mint which is very close to Ubuntu so the commands ought to work on it too.

I wanted to get this.  We'll call it option A:

[User]-----HTTPS over Internet----->[Single Login Proxy]----HTTP------>[Web Applications At Home]

It is also trivial then to set up this (Option B) since it only requires the removal of some configuration (comment out the A-only sections labeled in the config files) and then configuring each individual application with a password:

[User]-----HTTPS over Internet----->[No Login Proxy]----HTTP------>[Web Applications At Home]

Ensure you have your applications (Sab, Sickbeard, Couchpotato, etc) running already on their own port and record those port numbers.  Don't bother enabling SSL on any of those individual apps since we are going to handle it on Apache directly and tunnel the LAN HTTP traffic through HTTPS across the net.

Get a domain pointing towards your home IP and an SSL cert (OpenSSL type when the CA asks).  I used NameCheap and got everything (ssl and domain) for under 6 bucks before tax for a .info domain for one year, and they have free dynamic dns service.  You will need to generate a cert signing request on your Linux box to send off to the CA to get your cert, and there are a million guides for this.  You will also need dynamic DNS configured so your domain points to your home IP if it is dymanic and it probably is.  I will document the Dynamic DNS step in more detail in the future for my particular provider but it will be different if you use another service.

Install apache2 with apt-get install apache2. Configure a new site called proxy in /etc/apache2/sites-available with the following contents:

    <VirtualHost *:80>
      ServerName www.mywwwdomain.com
      Redirect permanent / https://www.mywwwdomain.com/
    </VirtualHost>
    <VirtualHost _default_:443>
    ServerName www.mywwwdomain.com
    SSLEngine on
    SSLProxyEngine On
    RequestHeader set Front-End-Https "On"
    ProxyPreserveHost On
    RewriteEngine on
    CacheDisable *
    SSLCipherSuite ALL:!ADH:!EXPORT56:RC4+RSA:+HIGH:+MEDIUM:+LOW:+SSLv2:+EXP:+eNULL
    SSLCertificateFile /local/path/to/certfile.cert
    SSLCertificateKeyFile /local/path/to/certkey.key
    
    ProxyRequests Off
    ProxyPreserveHost off
    
    DocumentRoot /var/www
    <Directory />
    ############ OPTION A ONLY##################
    AuthType Basic
    AuthName "My Homebrew Gateway"
    AuthUserFile /etc/apache2/passwords
    Require user your_login(s)_go_here
    ############# END OPTION A ONLY#############
    SSLRequireSSL
    SSLRequire  %{HTTP_HOST} eq "www.mywwwdomain.com"
    SSLOptions           +FakeBasicAuth +StrictRequire
    SSLRequire           %{SSL_CIPHER_USEKEYSIZE} >= 128
    ErrorDocument 403 https://www.mywwwdomain.com
      Options FollowSymLinks
      AllowOverride None
    </Directory>
    <Directory /var/www/>
    ############ OPTION A ONLY##################
    AuthType Basic
    AuthName "My Homebrew Gateway"
    AuthUserFile /etc/apache2/passwords
    Require user your_login(s)_go_here
    ############# END OPTION A ONLY#############
    SSLRequireSSL
    SSLRequire  %{HTTP_HOST} eq "www.mywwwdomain.com"
    SSLOptions           +FakeBasicAuth +StrictRequire
    SSLRequire           %{SSL_CIPHER_USEKEYSIZE} >= 128
    ErrorDocument 403 https://www.mywwwdomain.com
      Options Indexes FollowSymLinks MultiViews
      AllowOverride All
      Order allow,deny
      allow from all
    </Directory>
    
    <Location /sab>
       ProxyPass http://localhost:8080
       ProxyPassReverse http://localhost:8080
    </Location>
    <Location /couchpotato/>
       ProxyPass http://localhost:8084/couchpotato/
       ProxyPassReverse http://localhost:8084/couchpotato/
    </Location>
    <Location /subsonic>
       ProxyPass http://localhost:4040/subsonic
       ProxyPassReverse http://localhost:4040/subsonic
    </Location>
    <Location /sickbeard/>
       ProxyPass http://localhost:8081/sickbeard/
       ProxyPassReverse http://localhost:8081/sickbeard/
    </Location>
    <Location /manage>
       ProxyPass http://localhost:32400/manage/
       ProxyPassReverse http://localhost:32400/manage/
    </Location>
      RewriteEngine on
      RewriteOptions inherit
    </VirtualHost>
    
    Then set your /etc/apache2/httpd.conf file up like the following:
    ServerName www.mywwwdomain.com
    <Proxy *>
    Order deny,allow
    Allow from all
    ############ Option A Only ###################
    AuthType Basic
    AuthName "My Homebrew Gateway"
    AuthUserFile /etc/apache2/passwords
    Require user your_login(s)_go_here
    ############ End Option A Only #################
    SSLRequireSSL
    SSLRequire  %{HTTP_HOST} eq "www.mywwwdomain.com"
    SSLOptions           +FakeBasicAuth +StrictRequire
    SSLRequire           %{SSL_CIPHER_USEKEYSIZE} >= 128
    ErrorDocument 403 https://www.mywwwdomain.com
    </Proxy>
    

After you have these files in place remove /etc/apache2/sites-enabled/000-default and from within  /etc/apache2/sites-enabled run ln -s ../sites-available/proxy to make a softlink to the proxy site configuration file we just made.
To review the files we just made:

The "option A only" sections deal with basic auth using passwords.  In order to have passwords you will also need to create a password file containing your login/password info using the htpasswd command.  In the example provided, the passwords are stored in /etc/apache2/passwords and you could set this up with htpasswd -c /etc/apache2/passwords your_login.  It will then prompt you for the password.  If you want to enforce use hashed passwords there is an htpasswd option for that.  Basic auth is perfectly secure when used behind SSL encryption as is anything tunneled through an encrypted protocol.  So if anyone tells you different, punch them in the groin and scream like a rabid hyena.

The SSL options ensure https is enforced at specific locations and in general.  The httpd.conf file generally applies these settings, but I wanted to be super-sure that we are getting SSL on the auth in a few places where it didn't happen with the httpd.conf alone.

You should replace www.mywwwdomain.com with your actual internet-accessible domain.  Also, you should replace the your_login(s)_go_here with your actual login names as set up in your htpasswd created file.  There is a "Require group" directive if you want to use that instead.

In the location sections, the references to localhost are because these different applications are all hosted on various ports of the same machine that is acting as the reverse proxy.  If you have your apps on a different machine in your local network, replace localhost with the local static ip address (e.g. 192.168.0.x) for that server.

The location sections set domain subdirectories that proxy to the port numbers transparently.  The reason for doing this instead of something like sickbeard.mywwwdomain.com is because the cheap SSL certs are only licensed to www.mywwwdomain.com and can't do wildcards to match each subdomain.  If you want to drop hundreds of dollars a year on a wildcard cert, knock yourself out.  The method I used lets one cert work for unlimited applications.  Check that your own port numbers are used in the configuration.  Most of mine are probably not the defaults for these apps.

Lastly, we also set up a redirect here so that traffic coming to mywwwdomain.com will get sent to https://www.mywwdomain.com.  From there they may be asked to login (if using option A) and then sent to the landing page.  Also, it is important to know that each subdomain also requires authentication on the proxy if you go straight to them instead of the main landing page which we will make later, but once you are logged in it will not ask again until your browser is restarted.  This Option A authentication is really neat if you are only accessing things on the web, but it can hinder any third party applications you might want to use.  If using webapp-specific phone apps for instance, they will not understand the auth popup.  In those cases, omit or comment out the option a authentication and just turn on passwords on each individual app.  The proxy will still handle SSL for everything so you don't need it on each individual webapp.

None of this is going to work yet.  And we don't want it to yet.  First we need to do some app configuration. Here is the rundown:

Sickbeard will need extra configuration.  Stop sickbeard from running.  If you have a service setup for it this is as easy as service sickbeard stop. Then edit sickbeard's config.ini file and set web_root = /sickbeard with no quotes.  Then start sickbeard back up again.

Sab is already ready.

Couchpotato (V2) needs extra configuration.  If you are not using V2, you are on your own.  It is what I used and I am not going to muck with an older version for your benefit.  Go to settings, check advanced, in general enter "couchpotato" in the Url Base field.  Then restart it.

Subsonic requires additional configuration as well.  Turn subsonic off service subsonic stop.  Open up /usr/bin/subsonic (it is a script not a bin file) and set "SUBSONIC_CONTEXT_PATH=/subsonic".  Turn subsonic back on service subsonic start.  Note that you can't get rid of the login on subsonic.

You might not care about these last two since the above are the big four, but in case you do they are in there.  Of course, comment out any of the location sections in your proxy configuration file for apps you aren't using. 

Plex will work out of the box with the configuration I gave you and it using its default port.

EXtplorer is a web-based file manager.  If you have it configured, it will work with a proxy out of the box.  As far as deploying it though, if you don't already have it setup, DO NOT USE THE DEBIAN PACKAGE FOR IT!!!!  Don't do it!!  It will mess up apache and steel port 80 from it, and there is no documentation on how to configure or use the packaged form of it at this point.  Download the normal zip file for it, and follow this guy's guide.  Chmod the whole extplorer unzipped directory with 777 recursively chmod -R 777 extplorer and then chmod the .htusers.php file with the devil's number (666) like he said.  Also ensure you jack up the upload size and post size to something you can live with.  When you are done with his guide, go and softlink your /extplorer directory from within /var/www using ln -s /path/to/extplorer extplorer.  When you log into it with admin/admin the first time (after we fire up apache) you will also want to change the root directory to something more useful like /mnt or /media (or / if you are bold) depending on what you want to see.  

You need to port forward your server using your router so the outside world can get to it.  Forward 80->80 and 443->443 on your proxy IP.  You should not be doing this without a static IP on your proxy box. 

Finally, you need to fire apache up service apache2 restart.  When you do this, you will see some errors about modules or something telling you to go to the error log /var/logs/apache/error.log.  You will need to use a2enmod to load the modules you need enabled.  When you run it, it will give you a list of what you can turn on.  Turn on the ones it is bitching about and then try to restart apache again.  Eventually it will stop bitching and everything will work if you get the right modules turned on.  You will also probably need to configure the apache init script to restart on reboot with update-rc.d apache2 enable.

Finishing Touches:
We already set up a webroot so you can alter the html files in there and make your own custom landing page at /var/www/index.html.  I highly recommend this instead of having to remember all your subdirectories as your setup grows.  My landing page looks like this:

It is just a bunch of logos (stored in /var/www) linked with relative paths to the various apps.  So use an href="/sickbeard/" as the link for example.

Final thoughts:
If Jerry Springer can have them, so can I.  A nice improvement would be to allow you to access this on your local network without having your traffic redirected to the authentication/ssl domain when you type your.local.proxy.ip/appname/.  It really shouldn't be hard to configure, but I sunk so much time into this I really don't want to mess with it at the moment.  My simple workaround is to add local links to your landing page that use your.local.proxy.ip:app_specific_portnum to access each thing and you will need to append the directory in addition to the port number for some of them.  Here are the ones I needed for my specific port setup 8081/sickbeard, 4040/subsonic, 32400/manage (plex).  The rest worked already.  You won't have to authenticate when using these local addresses, but they aren't accessible to the outside world this way since you are only forwarding ports 80 and 443.  Extplorer is running in apache, so it cannot be worked around like this.  That is fine for me at home since my server serves up files with NFS/SMB locally and that is a much more integrated solution for your local systems anyway.   

Also, I spared you the hassle of setting up SSL on each individual app.  Not that it is difficult for most of those that can do it, but couchpotato (for example) cannot and it is nice to get zero-configuration SSL on each app you add down the road especially when the app didn't even offer it.  

Subsonic is very painful to setup with SSL directly because it uses utterly retarded java keystores that require converting your ssl cert into a pkcs12 type and then running it through some retarded java keystore importer app with a load of retarded flags and retarded options to generate a retarded file that retarded java can retardedly accept.  Then you have to stick options in /usr/bin/subsonic to tell it about that file and how to access it.  

Lastly, I expect some smart ass to say, "Hey, Mr. Sheez.  I noticed that the auth pops up before my browser says it is encrypted https."  Really punk?  Does it?  No, not really.  Your browser might make it look like the authentication is going to happen in plain text.  However, intercept your traffic like a grown-ass man and you'll see that nothing is being sent in non-encrypted http.  If it is, I'll eat my hat.  If not, you'll eat my hat.

Do let me know if anything legitimately needs correction or updating.  If you need clarification on anything I covered, then let me know in the comments.  Don't ask me some random apache question about an unrelated setup because you are too lazy to look it up.  I am not an apache guru in general.  I figured all this out through sheer force of will and shared it out of some twisted sense of altruism toward the reddit usenet community.  Anyway, have fun with this info mateys.  

Monday, August 1, 2011

The Android-based Car Stereos You Can Buy NOW

Move over Parrot Asteroid, there are several android-based dual din car stereos shipping now from Asia.

1.The Easy Rising ES666 is available direct here for under $400 USD.  This device features a fully removable android tablet which can operate all stereo functions and low profile hard controls for when the tablet is undocked.  It has TV tuning, bluetooth, RDS, wifi, 3g, GPS, and DVD.  The included tablet is a nice bonus prize. 


2.If you paid too much for your car, you can snag a Dynavin. It looks like you can get the DVN-E46 for your BMW, but they don't make generic DIN units.  This unit runs android 2.2. 

3.Another Chinese manufacturer is trying to sell a pretty sleek model.  However, I couldn't find anyone reselling this in the US yet, and a 1000 unit minimum order is too rich for my blood.  That said, it is obtainable in bulk so it should be for sale  somewhere.


If you don't mind buying from a no-name Chinese company, you can be one of the first to grab one of these bad boys.  In contrast, the Parrot device is rumored to run a locked-down app store and an older version of android, and God knows when/if it is actually coming out.  I find it odd that major manufacturers are not producing these types of units when the after market is threatened by Ford Sync and the upcoming GM Intellilink systems.

Tuesday, March 15, 2011

HOWTO: Use Google and Asterisk For Free Home Telephone Service

Recently I have been playing around with free VOIP solutions on my cellphone, and they were pretty neat.  However, they had a lot of jitter, dropped calls, and the occasional connection problem.  I wanted something truly stable with excellent call quality for work besides my cellphone.  Well, I have seen the light and found the answer, and it is a system that uses google talk (what you use to make phone calls from gchat) and google voice.  When it is done, you won't know the difference from your old telco, and it will be free.


BEFORE YOU START:

INGREDIENTS:
1 Linux server (it can be old and not-so powerful)
1 ATA (analog telephone adapter)*
1 or more phone handsets**
1 router with 2 free ports (for your Asterisk server and your analog telephone adapter)
1 google voice account that you don't typically log into for gmail or chatting

*For purposes of this guide, I suggest using the Grandstream HandyTone HT286

**I didn't have a home phone before I did this so I snagged a 3-handset answering system which connect through only one unit (as many these days do) and thus avoid any extra work inherent in connecting multiple phones through your existing home phone wiring.
WHAT YOU WILL GET:
When you are done, you will have a phone that acts like a phone and can call any number in the US and Canda for free or international numbers for pocket change.  You will receive calls to your google voice number on your phone.  You will get incoming phone numbers in your caller id, but you won't get names without a little extra work.  This is because the phone company provides this to you by querying their database.

You can take some extra steps so your Asterisk server has its own caller id database built from your google contacts, but that is outside the scope of this guide.  Many modern handsets (like mine) can check your stored contacts and show the associated names when those people call, so this wasn't a big enough deal to warrant the extra work for me.

WHAT YOU WON'T GET:
911 service!  Also, there is no guarantee Google will keep this free forever.  You also don't get some kludged-together solution where you have to use NAT-traversal or punch holes in your firewall with open ports since this uses native capabilities of Asterisk.  Because this method uses Asterisk by itself, you don't need FreePBX, PIAF (PBX In A Flash), or any other unnecessary extra software.


THE BIG PICTURE (literally):


HOWTO:

1.Set up Asterisk (AKA, the bulk of the work):

Make sure you have a Debian or Ubuntu computer with a static IP address.  You can set up a static IP in /etc/network/interfaces.  I would guess you can use Red Hat-like distros, but some of the locations, required packages, and commands may be a bit different so only go this route if you know what you are doing.   Also, stick to the darn guide.  If you try to get clever and just use the Asterisk package for your distro, it will be horribly outdated and not contain the functionality to do what you want.  You really need to compile it yourself until Asterisk 1.8+ is included in your Linux distribution.

1A.On your Linux box, follow the guide here but don't do step 5 or 6 since those are changes for devices with ARM processors, and I assume you are just using a standard non-ARM computer here.  Also, you don't have to install the second list of packages for FreePBX since you won't need it.  Note that your packages may be slightly different versions than those listed.  For example, on my Debian Squeeze system I found that the package libmysqlclient15-dev was now version 16.  Also, the forum thread in the next step (1B) talks about configuring only the minimum modules needed to run Asterisk, so you may want to reference it later if you need to tune Asterisk for very crappy hardware, but don't worry about that until you get it working.

1B.Next, go to this post and do steps 2-5 since you already did step 1. If you have a different ATA (analog telephone adapter) from what I suggested, then you will need to enter the configuration information as shown in step 6 and configure it on your own.

If you don't see a listing in Google Voice's Settings->Phones for your Google Chat account, then you need to first fire up gmail and dial a call with Google chat.  It should show up then.  

1C.After you finish up that guide, you will need to make some quick additional changes to conquer two issues I encountered.  As root, open /etc/asterisk/extensions.conf and add the following lines just after "exten => you@gmail.com, n,Set(CALLERID(name)=${DB(cidname/${CALLERID(num)})})".

Add these lines just after that line (with "you" replaced with your username):


Then restart your Asterisk server as root by executing /etc/init.d/asterisk restart.

The first new line rips the + sign off of incoming numbers so your phone's callerid will be able to handle them properly.  For example, my handset would show the number, but I couldn't return a call to a missed incoming call from my call log menu on the handset because it didn't recognize the +1-555-5555 format as a valid phone number.  This fixes such issues.

The other three lines let Asterisk pick up the phone while it is ringing, make it wait a very brief period, and then it sends a "1" tone to Google.  If you don't do something like this, incoming calls will be preceded by a message saying "Please press 1 to accept the call..." even if all such options are disabled on google voice.  Worse, pressing 1 didn't work for answering these calls.  If you don't want your phone to pick up calls when you don't answer, then you will need to do something a little different by having asterisk send 1 when you pick up a line based on the other method described here.

2. ATA Setup
2A.Grab your shiny new Handytone box, and connect it to power, ethernet, and your phone.  The manual for it is found here.

Pick up your handset and dial ***.  Then dial "01" to hear your IP address mode and 9 to toggle between dynamic and static.  I highly recommend a static IP.  After toggling to static, hit * to hear a readout of the Handytone's current IP address.   You can enter in a new one by typing 12 digits on the keypad (including any zero values).  You may need to reboot it after that.  You can do so by typing #, then 99, then 9.  After that, you can use a web browser on a computer connected to your router to access the web interface at the IP address you specified.

2B.On the web interface, type the default password "admin".

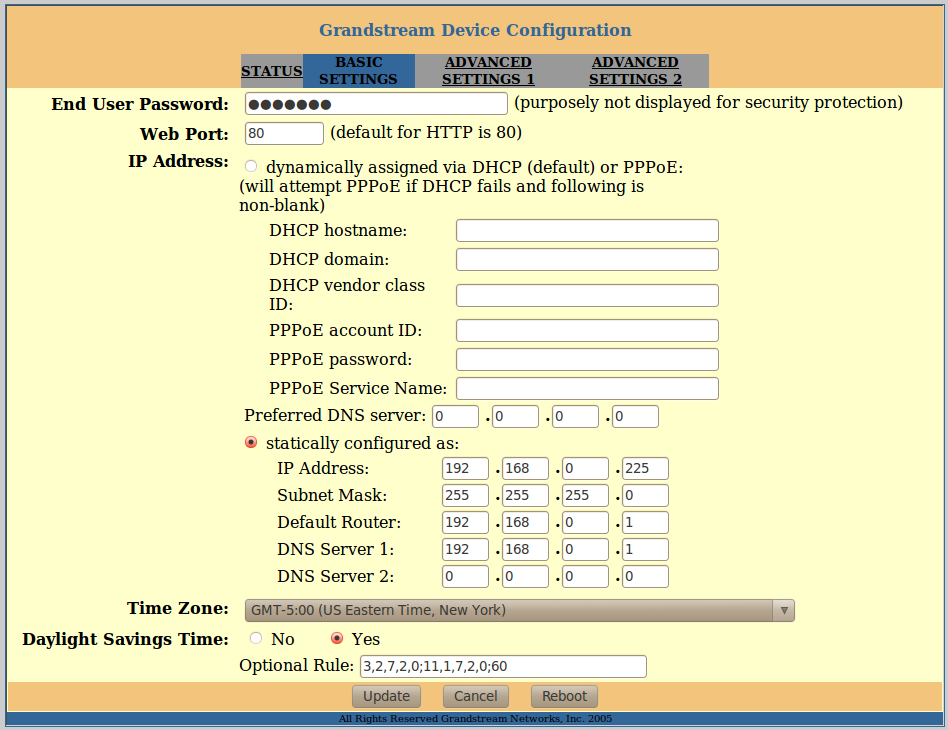
Click "basic settings" and enter an end-user password other than the default "123", then set the static configuration options making sure the IP is set to what you requested, and that subnet mask matches your router's (usually 255.255.255.0), and default router and DNS settings match your router's IP address for most users.  Also, set up your time info, and US folks in areas with DST should replace the Optional Rule with "3,2,7,2,0;11,1,7,2,0;60" so it follows the newer DST rules instead of the old ones preloaded on the device.  This will matter if you have a handset that resets its display time from the incoming line when you receive a call (as mine does).  Click "Update" when finished.


Click "advanced settings 1" and enter a new admin password in the first box (which you will use to login to the web interface in the future), your Asterix server's IP in the second and third boxes, and "101" in boxes 4 and 5.  If any STUN server options are turned on, deactivate them.  You can also fool around with the codec choices if you like.  I believe that the highest numbered G### options are the better ones.  Then click update (leaving all other settings alone on this page), and then click reboot.


No changes are needed on Advanced Settings 2.  If all goes well, after the reboot you can click status and see "Registered: Yes", and your Handytone won't flash red through the button on top intermittently.  Now make some calls and get some calls to try it out.  For me it is rock-solid stable even for 1hour+ teleconferences, and my Handy-tone is even plugged into a wireless network bridge since I was out of router ports.

After writing this, I figured out how to set your home area code as described here so you can dial local numbers with only seven digits.  Feel free to leave some comments praising me or asking for help. 

HOWTO: Setting up an SMB share on Debian Squeeze

Problem:
I needed to set up a Windows share on my new Debian box since I want it to be a file server for both Windows and Linux clients.   In addition, I wanted the server to be somewhat secure by requiring password access.  In this case, I set up a single shared directory and don't care about sharing /home directories.

Solution:

1.Make sure you have the necessary packages installed.  This will already be done if you selected file server in the Debian installation menu.

sudo apt-get install smbfs samba
 
2.In your /etc/samba/smb.conf file, make the following changes:

 Make sure you have "security = user" in there and uncommented.  It may be set to security = share by default.

In your "Share Definitions" section, set up a new share similar to the following:

[primary]
   comment = Guest access Share
   path = /mnt/primary
   writeable = yes
   valid users = @smb
   guest ok = no

This says that the share will be called "primary", the local path to the share directory is at /mnt/primary, authorized users can write, only users in the group smb are allowed, and anonymous guests cannot use this.

When you are done, save the file.  Then run testparm to see if there are any problems.  Lastly, restart the samba server with  /etc/init.d/samba restart.

3.Client Setup
On windows, choose map network drive from the "My Computer" screen.  Then enter \\debian_box_ip_address\share_name  eg: \\192.168.0.200\primary.  Then choose "login with different credentials" and enter your Linux  username/password.  Have fun.


Next I will cover nfs access.  NFS is what you will want to use for Linux client access.

Debian Networking Fiasco: udevd can't rename interface, file already exists

Recently I overhauled my FreeNAS fileserver and put debian on it so I could have a full-featured Linux distribution at the expense of more complex configuration.  That experience required resolving a number of issues.   This is the first of a series of issues and how I resolved them.  After I wrap up these issue posts, I will do a howto on using google voice and Asterisk for free calling.

Problem:
I get a message saying something like "udevd-work: Cant rename interface eth1-eth0 file already exists."  And the network interface wasn't working.  Also, this issue caused the box to hang for about one minute at boot.

Resolution:
The best I can determine, the onboard ethernet was brought up first, but the system then realized I was connecting through an ethernet adapter card and tried to move the second card to eth0 which was already assigned.  My solution was to prevent the on-board ethernet from starting up.

I could tell the networking was misconfiguring itself by removing the file /etc/udev/rules.d/70-persistent-net.rules and rebooting.  Everything would come up fine once, and then it would be messed up on the next reboot.

I ran lspci to determine what my network interfaces were, and I saw these two:
Ethernet controller: nVidia Corporation MCP77 Ethernet (rev a2)
Ethernet controller: Realtek Semiconductor Co., Ltd. RTL-8169 Gigabit Ethernet (rev 10)

The realtek is the one I want to use, but the nVidia one is the troublemaker.  So I googled to find out the module used by that ethernet controller.  The module was forcedeth.  Next I set about preventing that module from loading, and found this guide.

As root, I then created the suggested file using the command echo "blacklist forcedeth" > /etc/modprobe.d/forcedeth.conf

I then ran depmod -ae, and the system whined about the command.  Then I ran update-initramfs -tu

Lastly, I deleted /lib/udev/rules.d/70-persistent-net.rules in the hopes that a valid one would be produced.  After all that, I rebooted, and it worked fine.

Saturday, March 12, 2011

HOWTO: Free VOIP on Android Phone #2

Previously, I showed you how to get free voip with a combo of pbxes, google voice, and some other tools.   I since discovered there is an easier way that eliminates pbxes altogether which is described below.  Even more recently, I wrote a guide to setting up a high-quality and reliable solution for free home telephone using only Asterisk, an ATA, and Google Talk/Voice.

1.Get a free EKIGA sip address

Sign up for a SIP account with EKIGA here.

2.Get a free IPKALL number

Sign up for a phone number here.  Enter your sip account info for the account you registered in step 1.

3.Get or use your google voice account, and set it to forward to your IPKALL number.  More detail on this can be found in step 4 of the previous guide.

4.Get the "google voice dialer" (not google voice) and csipsimple apps for android.

In csipsimple, you follow the wizard launched by going to menu -> accounts -> add account -> worldwide providers -> ekiga.   It merely requires your ekiga login and password.  Now you are ready to receive calls to your IPKALL number (which will ring your ekiga sip address which will ring csipsimple).

To make free outgoing voip calls you need to configure the google voice dialer app with your google voice account info.  You can then customize the dialing to select when you want to make your calls with google voice callback to your IPKALL number.  Do not dial out with csipsimple through Ekiga itself since it will not work.  More detail on google voice callback app use can be found in step 5 of the previous guide (just replace any references to sipdroid with csipsimple as you read).

There you have it.  Free voip calling on your android cellphone with a relatively easy setup.  Have fun.

Coming soon, I am going to show you how to set up your own Asterisk 1.8+ server and get free high-quality, seamless VOIP at home using only google voice+talk and an analog telephone adapter.

Monday, February 14, 2011

m4b audiobook to cd's with Ubuntu: Valentine's Day Edition

Problem:
My wife came to me asking about putting her large .m4b audiobook files on cd's to listen to while she is on the road for work.  These are biiiiig files with some over 10 hours each.  They were not DRM'ed, but they did have still jpeg images as a video stream.

Bad Solution:
Files this big require using compressed output since WAV files will exceed aloud maximum size.  This prevented me from using the mplayer -ao pcm trick successfully to write a file.  I ended up with WAV files that only captured half or less of each book.

Good Solution:
I settled on ffmpeg to write mp3 files.  After getting the mp3's, it would be easy if she had an mp3 cd player in her car, but she doesn't.  Therefore I will also describe how to split the mp3's at cd-length intervals at the end.

1.) First get the tools.  Only the first two are needed if you don't want to split your mp3's at the end.

sudo apt-get install ffmpeg libavcodec-extra-52 mp3splt

Also, if you have spaces in your file names and a bunch of m4b files you will want to process iteratively, you may want to replace the spaces with underscores.  Otherwise, common shell for looping methods will treat each word like a filename.  This can be done easily with rename.


rename 's/\ /_/g' *.m4b 

This says to replace all spaces in all file names ending in '.m4b' with underscores.

2.) Create an mp3 file from your m4b file.

ffmpeg -i yourfile.m4b -acodec libmp3lame -ar 22050 -ab 320k yourfile.mp3

The codec libmp3lame is included in that libavcodec package I told you to get.  The sample rate of 22050 sounds fine for most audio books, but you can adjust this if needed.  Lastly, set the bitrate for encoding your mp3.  Even though I specified 320k, the software only did it at 160k owing to a codec implementation limitation I suppose.

I had a bunch of m4b files to convert, so I used the following one liner to do all of them.  It will replace the extension with .mp3.


for m4b in *.m4b; do ffmpeg -i $m4b -acodec libmp3lame -ar 22050 -ab 320k ${m4b%.m4b}.mp3; done

3.) Now you have one or many big mp3's.  If that is all you need, then have fun.  For me, the 10 hour mp3's are a problem.  Now you'll need to split the large mp3's.  Luckily this is trivial on Linux with mp3splt.

mp3splt -t 80.0 yourfile.mp3

My cd's are 80 minutes, so the command above says split my file into as many 80 minute and 0 second files as needed. The split files will be named with start and end time data in this case, but the mp3splt tool has options to customize how the file names are numbered and named if you want more control.


In my case, I used this on a bunch of mp3 files so I did the following.

for m in *.mp3; do mp3splt -t 80.0 -d ${m%.mp3} $m; done

This command creates a separate directory (-d flag) which has the name with the original mp3 sans ".mp3" and places all the split files inside it (handy to prevent creating a jumble of files).


Have fun, and happy valentine's day.