Move over Parrot Asteroid, there are several android-based dual din car stereos shipping now from Asia.
1.The Easy Rising ES666 is available direct here for under $400 USD. This device features a fully removable android tablet which can operate all stereo functions and low profile hard controls for when the tablet is undocked. It has TV tuning, bluetooth, RDS, wifi, 3g, GPS, and DVD. The included tablet is a nice bonus prize.
2.If you paid too much for your car, you can snag a Dynavin. It looks like you can get the DVN-E46 for your BMW, but they don't make generic DIN units. This unit runs android 2.2.
3.Another Chinese manufacturer is trying to sell a pretty sleek model. However, I couldn't find anyone reselling this in the US yet, and a 1000 unit minimum order is too rich for my blood. That said, it is obtainable in bulk so it should be for sale somewhere.
If you don't mind buying from a no-name Chinese company, you can be one of the first to grab one of these bad boys. In contrast, the Parrot device is rumored to run a locked-down app store and an older version of android, and God knows when/if it is actually coming out. I find it odd that major manufacturers are not producing these types of units when the after market is threatened by Ford Sync and the upcoming GM Intellilink systems.
Monday, August 1, 2011
Tuesday, March 15, 2011
HOWTO: Use Google and Asterisk For Free Home Telephone Service
Recently I have been playing around with free VOIP solutions on my cellphone, and they were pretty neat. However, they had a lot of jitter, dropped calls, and the occasional connection problem. I wanted something truly stable with excellent call quality for work besides my cellphone. Well, I have seen the light and found the answer, and it is a system that uses google talk (what you use to make phone calls from gchat) and google voice. When it is done, you won't know the difference from your old telco, and it will be free.
BEFORE YOU START:
INGREDIENTS:
1 Linux server (it can be old and not-so powerful)
1 ATA (analog telephone adapter)*
1 or more phone handsets**
1 router with 2 free ports (for your Asterisk server and your analog telephone adapter)
1 google voice account that you don't typically log into for gmail or chatting
*For purposes of this guide, I suggest using the Grandstream HandyTone HT286
**I didn't have a home phone before I did this so I snagged a 3-handset answering system which connect through only one unit (as many these days do) and thus avoid any extra work inherent in connecting multiple phones through your existing home phone wiring.
WHAT YOU WILL GET:
When you are done, you will have a phone that acts like a phone and can call any number in the US and Canda for free or international numbers for pocket change. You will receive calls to your google voice number on your phone. You will get incoming phone numbers in your caller id, but you won't get names without a little extra work. This is because the phone company provides this to you by querying their database.
You can take some extra steps so your Asterisk server has its own caller id database built from your google contacts, but that is outside the scope of this guide. Many modern handsets (like mine) can check your stored contacts and show the associated names when those people call, so this wasn't a big enough deal to warrant the extra work for me.
WHAT YOU WON'T GET:
911 service! Also, there is no guarantee Google will keep this free forever. You also don't get some kludged-together solution where you have to use NAT-traversal or punch holes in your firewall with open ports since this uses native capabilities of Asterisk. Because this method uses Asterisk by itself, you don't need FreePBX, PIAF (PBX In A Flash), or any other unnecessary extra software.
THE BIG PICTURE (literally):

1B.Next, go to this post and do steps 2-5 since you already did step 1. If you have a different ATA (analog telephone adapter) from what I suggested, then you will need to enter the configuration information as shown in step 6 and configure it on your own.
Add these lines just after that line (with "you" replaced with your username):
Then restart your Asterisk server as root by executing /etc/init.d/asterisk restart.
The first new line rips the + sign off of incoming numbers so your phone's callerid will be able to handle them properly. For example, my handset would show the number, but I couldn't return a call to a missed incoming call from my call log menu on the handset because it didn't recognize the +1-555-5555 format as a valid phone number. This fixes such issues.
The other three lines let Asterisk pick up the phone while it is ringing, make it wait a very brief period, and then it sends a "1" tone to Google. If you don't do something like this, incoming calls will be preceded by a message saying "Please press 1 to accept the call..." even if all such options are disabled on google voice. Worse, pressing 1 didn't work for answering these calls. If you don't want your phone to pick up calls when you don't answer, then you will need to do something a little different by having asterisk send 1 when you pick up a line based on the other method described here.
2. ATA Setup
2A.Grab your shiny new Handytone box, and connect it to power, ethernet, and your phone. The manual for it is found here.
Pick up your handset and dial ***. Then dial "01" to hear your IP address mode and 9 to toggle between dynamic and static. I highly recommend a static IP. After toggling to static, hit * to hear a readout of the Handytone's current IP address. You can enter in a new one by typing 12 digits on the keypad (including any zero values). You may need to reboot it after that. You can do so by typing #, then 99, then 9. After that, you can use a web browser on a computer connected to your router to access the web interface at the IP address you specified.
2B.On the web interface, type the default password "admin".
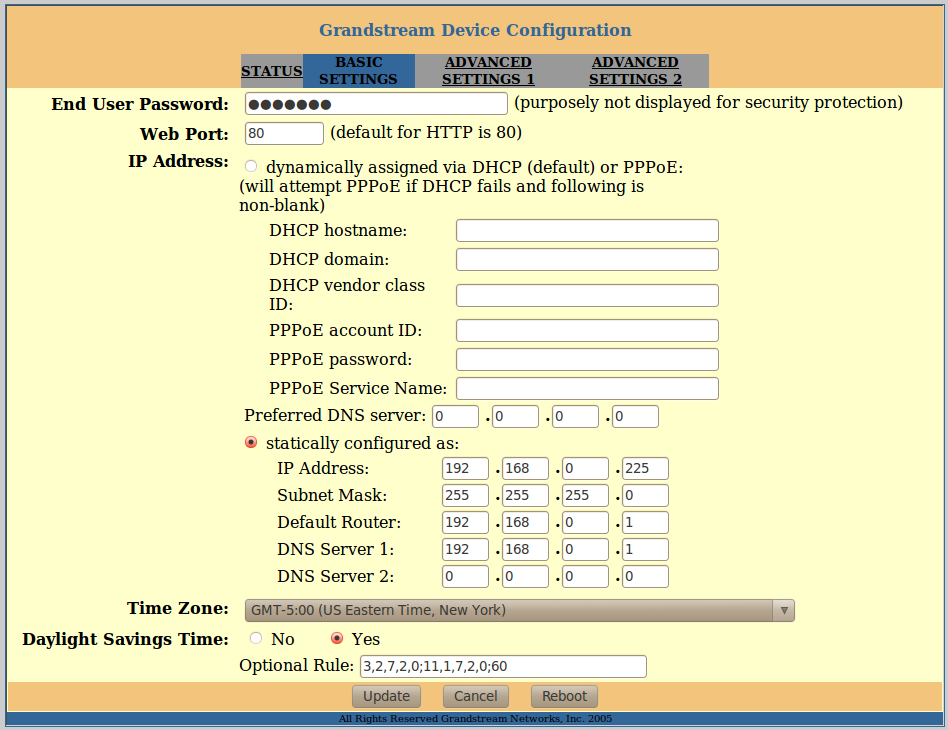
Click "basic settings" and enter an end-user password other than the default "123", then set the static configuration options making sure the IP is set to what you requested, and that subnet mask matches your router's (usually 255.255.255.0), and default router and DNS settings match your router's IP address for most users. Also, set up your time info, and US folks in areas with DST should replace the Optional Rule with "3,2,7,2,0;11,1,7,2,0;60" so it follows the newer DST rules instead of the old ones preloaded on the device. This will matter if you have a handset that resets its display time from the incoming line when you receive a call (as mine does). Click "Update" when finished.

Click "advanced settings 1" and enter a new admin password in the first box (which you will use to login to the web interface in the future), your Asterix server's IP in the second and third boxes, and "101" in boxes 4 and 5. If any STUN server options are turned on, deactivate them. You can also fool around with the codec choices if you like. I believe that the highest numbered G### options are the better ones. Then click update (leaving all other settings alone on this page), and then click reboot.

No changes are needed on Advanced Settings 2. If all goes well, after the reboot you can click status and see "Registered: Yes", and your Handytone won't flash red through the button on top intermittently. Now make some calls and get some calls to try it out. For me it is rock-solid stable even for 1hour+ teleconferences, and my Handy-tone is even plugged into a wireless network bridge since I was out of router ports.
After writing this, I figured out how to set your home area code as described here so you can dial local numbers with only seven digits. Feel free to leave some comments praising me or asking for help.
BEFORE YOU START:
INGREDIENTS:
1 Linux server (it can be old and not-so powerful)
1 ATA (analog telephone adapter)*
1 or more phone handsets**
1 router with 2 free ports (for your Asterisk server and your analog telephone adapter)
1 google voice account that you don't typically log into for gmail or chatting
*For purposes of this guide, I suggest using the Grandstream HandyTone HT286
**I didn't have a home phone before I did this so I snagged a 3-handset answering system
WHAT YOU WILL GET:
When you are done, you will have a phone that acts like a phone and can call any number in the US and Canda for free or international numbers for pocket change. You will receive calls to your google voice number on your phone. You will get incoming phone numbers in your caller id, but you won't get names without a little extra work. This is because the phone company provides this to you by querying their database.
You can take some extra steps so your Asterisk server has its own caller id database built from your google contacts, but that is outside the scope of this guide. Many modern handsets (like mine) can check your stored contacts and show the associated names when those people call, so this wasn't a big enough deal to warrant the extra work for me.
WHAT YOU WON'T GET:
911 service! Also, there is no guarantee Google will keep this free forever. You also don't get some kludged-together solution where you have to use NAT-traversal or punch holes in your firewall with open ports since this uses native capabilities of Asterisk. Because this method uses Asterisk by itself, you don't need FreePBX, PIAF (PBX In A Flash), or any other unnecessary extra software.
THE BIG PICTURE (literally):

HOWTO:
1.Set up Asterisk (AKA, the bulk of the work):
Make sure you have a Debian or Ubuntu computer with a static IP address. You can set up a static IP in /etc/network/interfaces. I would guess you can use Red Hat-like distros, but some of the locations, required packages, and commands may be a bit different so only go this route if you know what you are doing. Also, stick to the darn guide. If you try to get clever and just use the Asterisk package for your distro, it will be horribly outdated and not contain the functionality to do what you want. You really need to compile it yourself until Asterisk 1.8+ is included in your Linux distribution.
1A.On your Linux box, follow the guide here but don't do step 5 or 6 since those are changes for devices with ARM processors, and I assume you are just using a standard non-ARM computer here. Also, you don't have to install the second list of packages for FreePBX since you won't need it. Note that your packages may be slightly different versions than those listed. For example, on my Debian Squeeze system I found that the package libmysqlclient15-dev was now version 16. Also, the forum thread in the next step (1B) talks about configuring only the minimum modules needed to run Asterisk, so you may want to reference it later if you need to tune Asterisk for very crappy hardware, but don't worry about that until you get it working.
1B.Next, go to this post and do steps 2-5 since you already did step 1. If you have a different ATA (analog telephone adapter) from what I suggested, then you will need to enter the configuration information as shown in step 6 and configure it on your own.
If you don't see a listing in Google Voice's Settings->Phones for your Google Chat account, then you need to first fire up gmail and dial a call with Google chat. It should show up then.
1C.After you finish up that guide, you will need to make some quick additional changes to conquer two issues I encountered. As root, open /etc/asterisk/extensions.conf and add the following lines just after "exten => you@gmail.com, n,Set(CALLERID(name)=${DB(cidname/${CALLERID(num)})})".
Then restart your Asterisk server as root by executing /etc/init.d/asterisk restart.
The first new line rips the + sign off of incoming numbers so your phone's callerid will be able to handle them properly. For example, my handset would show the number, but I couldn't return a call to a missed incoming call from my call log menu on the handset because it didn't recognize the +1-555-5555 format as a valid phone number. This fixes such issues.
The other three lines let Asterisk pick up the phone while it is ringing, make it wait a very brief period, and then it sends a "1" tone to Google. If you don't do something like this, incoming calls will be preceded by a message saying "Please press 1 to accept the call..." even if all such options are disabled on google voice. Worse, pressing 1 didn't work for answering these calls. If you don't want your phone to pick up calls when you don't answer, then you will need to do something a little different by having asterisk send 1 when you pick up a line based on the other method described here.
2. ATA Setup
2A.Grab your shiny new Handytone box, and connect it to power, ethernet, and your phone. The manual for it is found here.
Pick up your handset and dial ***. Then dial "01" to hear your IP address mode and 9 to toggle between dynamic and static. I highly recommend a static IP. After toggling to static, hit * to hear a readout of the Handytone's current IP address. You can enter in a new one by typing 12 digits on the keypad (including any zero values). You may need to reboot it after that. You can do so by typing #, then 99, then 9. After that, you can use a web browser on a computer connected to your router to access the web interface at the IP address you specified.
2B.On the web interface, type the default password "admin".
Click "basic settings" and enter an end-user password other than the default "123", then set the static configuration options making sure the IP is set to what you requested, and that subnet mask matches your router's (usually 255.255.255.0), and default router and DNS settings match your router's IP address for most users. Also, set up your time info, and US folks in areas with DST should replace the Optional Rule with "3,2,7,2,0;11,1,7,2,0;60" so it follows the newer DST rules instead of the old ones preloaded on the device. This will matter if you have a handset that resets its display time from the incoming line when you receive a call (as mine does). Click "Update" when finished.
Click "advanced settings 1" and enter a new admin password in the first box (which you will use to login to the web interface in the future), your Asterix server's IP in the second and third boxes, and "101" in boxes 4 and 5. If any STUN server options are turned on, deactivate them. You can also fool around with the codec choices if you like. I believe that the highest numbered G### options are the better ones. Then click update (leaving all other settings alone on this page), and then click reboot.

No changes are needed on Advanced Settings 2. If all goes well, after the reboot you can click status and see "Registered: Yes", and your Handytone won't flash red through the button on top intermittently. Now make some calls and get some calls to try it out. For me it is rock-solid stable even for 1hour+ teleconferences, and my Handy-tone is even plugged into a wireless network bridge
After writing this, I figured out how to set your home area code as described here so you can dial local numbers with only seven digits. Feel free to leave some comments praising me or asking for help.
HOWTO: Setting up an SMB share on Debian Squeeze
Problem:
I needed to set up a Windows share on my new Debian box since I want it to be a file server for both Windows and Linux clients. In addition, I wanted the server to be somewhat secure by requiring password access. In this case, I set up a single shared directory and don't care about sharing /home directories.
Solution:
1.Make sure you have the necessary packages installed. This will already be done if you selected file server in the Debian installation menu.
sudo apt-get install smbfs samba
2.In your /etc/samba/smb.conf file, make the following changes:
Make sure you have "security = user" in there and uncommented. It may be set to security = share by default.
In your "Share Definitions" section, set up a new share similar to the following:
[primary]
comment = Guest access Share
path = /mnt/primary
writeable = yes
valid users = @smb
guest ok = no
This says that the share will be called "primary", the local path to the share directory is at /mnt/primary, authorized users can write, only users in the group smb are allowed, and anonymous guests cannot use this.
When you are done, save the file. Then run testparm to see if there are any problems. Lastly, restart the samba server with /etc/init.d/samba restart.
3.Client Setup
On windows, choose map network drive from the "My Computer" screen. Then enter \\debian_box_ip_address\share_name eg: \\192.168.0.200\primary. Then choose "login with different credentials" and enter your Linux username/password. Have fun.
Next I will cover nfs access. NFS is what you will want to use for Linux client access.
Debian Networking Fiasco: udevd can't rename interface, file already exists
Recently I overhauled my FreeNAS fileserver and put debian on it so I could have a full-featured Linux distribution at the expense of more complex configuration. That experience required resolving a number of issues. This is the first of a series of issues and how I resolved them. After I wrap up these issue posts, I will do a howto on using google voice and Asterisk for free calling.
Problem:
I get a message saying something like "udevd-work: Cant rename interface eth1-eth0 file already exists." And the network interface wasn't working. Also, this issue caused the box to hang for about one minute at boot.
Resolution:
The best I can determine, the onboard ethernet was brought up first, but the system then realized I was connecting through an ethernet adapter card and tried to move the second card to eth0 which was already assigned. My solution was to prevent the on-board ethernet from starting up.
I could tell the networking was misconfiguring itself by removing the file /etc/udev/rules.d/70-persistent-net.rules and rebooting. Everything would come up fine once, and then it would be messed up on the next reboot.
I ran lspci to determine what my network interfaces were, and I saw these two:
Ethernet controller: nVidia Corporation MCP77 Ethernet (rev a2)
Ethernet controller: Realtek Semiconductor Co., Ltd. RTL-8169 Gigabit Ethernet (rev 10)
The realtek is the one I want to use, but the nVidia one is the troublemaker. So I googled to find out the module used by that ethernet controller. The module was forcedeth. Next I set about preventing that module from loading, and found this guide.
As root, I then created the suggested file using the command echo "blacklist forcedeth" > /etc/modprobe.d/forcedeth.conf
I then ran depmod -ae, and the system whined about the command. Then I ran update-initramfs -tu
Lastly, I deleted /lib/udev/rules.d/70-persistent-net.rules in the hopes that a valid one would be produced. After all that, I rebooted, and it worked fine.
Saturday, March 12, 2011
HOWTO: Free VOIP on Android Phone #2
Previously, I showed you how to get free voip with a combo of pbxes, google voice, and some other tools. I since discovered there is an easier way that eliminates pbxes altogether which is described below. Even more recently, I wrote a guide to setting up a high-quality and reliable solution for free home telephone using only Asterisk, an ATA, and Google Talk/Voice.
1.Get a free EKIGA sip address
Sign up for a SIP account with EKIGA here.
2.Get a free IPKALL number
Sign up for a phone number here. Enter your sip account info for the account you registered in step 1.
3.Get or use your google voice account, and set it to forward to your IPKALL number. More detail on this can be found in step 4 of the previous guide.
4.Get the "google voice dialer" (not google voice) and csipsimple apps for android.
In csipsimple, you follow the wizard launched by going to menu -> accounts -> add account -> worldwide providers -> ekiga. It merely requires your ekiga login and password. Now you are ready to receive calls to your IPKALL number (which will ring your ekiga sip address which will ring csipsimple).
To make free outgoing voip calls you need to configure the google voice dialer app with your google voice account info. You can then customize the dialing to select when you want to make your calls with google voice callback to your IPKALL number. Do not dial out with csipsimple through Ekiga itself since it will not work. More detail on google voice callback app use can be found in step 5 of the previous guide (just replace any references to sipdroid with csipsimple as you read).
There you have it. Free voip calling on your android cellphone with a relatively easy setup. Have fun.
Coming soon, I am going to show you how to set up your own Asterisk 1.8+ server and get free high-quality, seamless VOIP at home using only google voice+talk and an analog telephone adapter.
Monday, February 14, 2011
m4b audiobook to cd's with Ubuntu: Valentine's Day Edition
Problem:
My wife came to me asking about putting her large .m4b audiobook files on cd's to listen to while she is on the road for work. These are biiiiig files with some over 10 hours each. They were not DRM'ed, but they did have still jpeg images as a video stream.
Bad Solution:
Files this big require using compressed output since WAV files will exceed aloud maximum size. This prevented me from using the mplayer -ao pcm trick successfully to write a file. I ended up with WAV files that only captured half or less of each book.
Good Solution:
I settled on ffmpeg to write mp3 files. After getting the mp3's, it would be easy if she had an mp3 cd player in her car, but she doesn't. Therefore I will also describe how to split the mp3's at cd-length intervals at the end.
1.) First get the tools. Only the first two are needed if you don't want to split your mp3's at the end.
sudo apt-get install ffmpeg libavcodec-extra-52 mp3splt
Also, if you have spaces in your file names and a bunch of m4b files you will want to process iteratively, you may want to replace the spaces with underscores. Otherwise, common shell for looping methods will treat each word like a filename. This can be done easily with rename.
This says to replace all spaces in all file names ending in '.m4b' with underscores.
2.) Create an mp3 file from your m4b file.
ffmpeg -i yourfile.m4b -acodec libmp3lame -ar 22050 -ab 320k yourfile.mp3
The codec libmp3lame is included in that libavcodec package I told you to get. The sample rate of 22050 sounds fine for most audio books, but you can adjust this if needed. Lastly, set the bitrate for encoding your mp3. Even though I specified 320k, the software only did it at 160k owing to a codec implementation limitation I suppose.
I had a bunch of m4b files to convert, so I used the following one liner to do all of them. It will replace the extension with .mp3.
for m4b in *.m4b; do ffmpeg -i $m4b -acodec libmp3lame -ar 22050 -ab 320k ${m4b%.m4b}.mp3; done
3.) Now you have one or many big mp3's. If that is all you need, then have fun. For me, the 10 hour mp3's are a problem. Now you'll need to split the large mp3's. Luckily this is trivial on Linux with mp3splt.
mp3splt -t 80.0 yourfile.mp3
My cd's are 80 minutes, so the command above says split my file into as many 80 minute and 0 second files as needed. The split files will be named with start and end time data in this case, but the mp3splt tool has options to customize how the file names are numbered and named if you want more control.
In my case, I used this on a bunch of mp3 files so I did the following.
for m in *.mp3; do mp3splt -t 80.0 -d ${m%.mp3} $m; done
This command creates a separate directory (-d flag) which has the name with the original mp3 sans ".mp3" and places all the split files inside it (handy to prevent creating a jumble of files).
Have fun, and happy valentine's day.
My wife came to me asking about putting her large .m4b audiobook files on cd's to listen to while she is on the road for work. These are biiiiig files with some over 10 hours each. They were not DRM'ed, but they did have still jpeg images as a video stream.
Bad Solution:
Files this big require using compressed output since WAV files will exceed aloud maximum size. This prevented me from using the mplayer -ao pcm trick successfully to write a file. I ended up with WAV files that only captured half or less of each book.
Good Solution:
I settled on ffmpeg to write mp3 files. After getting the mp3's, it would be easy if she had an mp3 cd player in her car, but she doesn't. Therefore I will also describe how to split the mp3's at cd-length intervals at the end.
1.) First get the tools. Only the first two are needed if you don't want to split your mp3's at the end.
sudo apt-get install ffmpeg libavcodec-extra-52 mp3splt
Also, if you have spaces in your file names and a bunch of m4b files you will want to process iteratively, you may want to replace the spaces with underscores. Otherwise, common shell for looping methods will treat each word like a filename. This can be done easily with rename.
rename 's/\ /_/g' *.m4b This says to replace all spaces in all file names ending in '.m4b' with underscores.
2.) Create an mp3 file from your m4b file.
ffmpeg -i yourfile.m4b -acodec libmp3lame -ar 22050 -ab 320k yourfile.mp3
The codec libmp3lame is included in that libavcodec package I told you to get. The sample rate of 22050 sounds fine for most audio books, but you can adjust this if needed. Lastly, set the bitrate for encoding your mp3. Even though I specified 320k, the software only did it at 160k owing to a codec implementation limitation I suppose.
I had a bunch of m4b files to convert, so I used the following one liner to do all of them. It will replace the extension with .mp3.
for m4b in *.m4b; do ffmpeg -i $m4b -acodec libmp3lame -ar 22050 -ab 320k ${m4b%.m4b}.mp3; done
3.) Now you have one or many big mp3's. If that is all you need, then have fun. For me, the 10 hour mp3's are a problem. Now you'll need to split the large mp3's. Luckily this is trivial on Linux with mp3splt.
mp3splt -t 80.0 yourfile.mp3
My cd's are 80 minutes, so the command above says split my file into as many 80 minute and 0 second files as needed. The split files will be named with start and end time data in this case, but the mp3splt tool has options to customize how the file names are numbered and named if you want more control.
In my case, I used this on a bunch of mp3 files so I did the following.
for m in *.mp3; do mp3splt -t 80.0 -d ${m%.mp3} $m; done
This command creates a separate directory (-d flag) which has the name with the original mp3 sans ".mp3" and places all the split files inside it (handy to prevent creating a jumble of files).
Have fun, and happy valentine's day.
Monday, January 31, 2011
Sansa Clip Plus on Ubuntu 10.04
Problem:I had some trouble with my Sansa on Ubuntu. I could see it as a drive, but I couldn't access it.
Solution: Update the firmware. If you have a windows computer, you can get the most recent firmware update that way. There may be a way to load in Linux as well.
After that, you can use it as a drive in Ubuntu. To do this, go to settings -> system -> usb -> MSC on the device. Alternatively, you can select MTP to use it through your media player's interface, but this seems kind of clunky to me.
Extra Credit:
I keep my files on a honking FreeNAS media server which has lots of wonderful redundancy which I access through NFS. I didn't want to mess about with a media player to sort and load the files, but I did want something that could only get my more recent files (anything from the last year) and load them. My solution was simple, create a shell script to do it.
Here is the code. In the revised version, I added an optional command line argument for the number of days so it isn't locked to 365.
The code messes with $IFS to handle spaces in names, creates a directory to hold the files locally, finds files in a 2 directory deep structure which are 365 days old or newer, and then copies those files to the local directory. After that, it copies those local files to the player (removing asterices in the file name in the process). When done, it deletes the local directory before exiting.
Feel free to modify this code and distribute it as you will. It would be a lot more flexible with arguments to provide the mp3 folder path, local path, and media player path. Also, users may want to skip the step of intermediate copying if they store their files locally already. If you do keep your files right on your PC, I can't warn enough about the necessity of backups.
Monday, January 24, 2011
Consolidating Your Pile of Home Theater Remotes
The problem, you have a pile of remotes to go with all your components. This can get irritating and unmanageable in a hurry. The good news is that there are a lot of options out there to replace your pile of remotes, but the bad news is that finding the right one may drive you up a wall. In selecting a remote there are a number of important features you should consider.
1.Buttons
This is the most obvious feature. You can't do much if you don't have the right buttons, and you'll want to find a button that has similarly labeled buttons to those on your oem remotes so you don't end up assigning existing functions to illogically labeled buttons. If price is no object, you can even opt for crazy touchscreen remotes with customizable button layouts. Some remotes have a half-way solution using a screen where you can apply labels to adjacent buttons.
2.Learning
Every universal remote around can use hand-entered numeric codes or search through a list of built-in codes to find one which is pre-set for a device like yours. This is great if you only by on-brand electronics which use popular existing codes. If you get something off brand or want to control some other odd IR device like an HDMI switch or lighting system, then this may be your best choice. With this feature, the new remote can record the IR output triggered by a button on your existing remote to one of its own buttons.
3.Macro
This feature lets you program a sequence of commands to be triggered by a certain button. This gives you the ability to do some pretty neat stuff at the push of a button like turn devices on or off, navigate menus, or switch modes. Many remotes even let you use learned buttons in macros as well. Be aware that lower cost remotes may have very small limits on the number of commands per macro or lack control of pauses such that the macro might finish before a device has time to turn on completely and become responsive to remote signals.
4.Screens
A screen can make it much easier to program a remote since you don't need external paper manuals to enter codes and can just select your device from a menu to program them. However, screens may decrease durability and battery life substantially. Because of rapid battery drain, many of these remotes include charging docks which bring their own issues (contact corrosion). However, touch screens can add substantial flexibility to user interface of the remote control.
5.RF
Some remotes can fire off radio signals in addition to or rather than infrared (IR) signals. The advantage is that RF has no line-of-sight requirement. These RF signals can be converted to IR by a box which can "shine" those IR signals at your components. This means you can hide your components in a closet or another room if you want, and you'll never have to worry about aim again.
6.Cost
You can spend anywhere from ten bucks to several thousand on remotes, but you don't have to break the bank. There are remotes around $20 with learning and macro capabilities, and many under $100 which have screens and can be programmed via PC.
My suggestions for various price ranges up to $100 include:
$20 Sony RMVL600 (learning, 16 command macros, 8
$25 One For All OARI06G
devices)
$25 One For All OARI06G (learning, 15 command macros, modern button layout)
$40 URC RF10 (very good learning storage, and 10 macros with 55 steps each, one line monchrome lcd, and RF)
$80 URC RF20 bundle (extensive learning storage, 190 step macros, monochrome lcd, RF and remote IR emitter included!)
$90 URC-R50 (18 devices, extensive learning storage, 255 step macros, color screen)
I don't like spending a lot on remotes, so I can't provide much first hand advice on remotes over $100. However, you can get good advice at remotecentral. If you just need a general remote and simple macros, the Sony would suit you. It's learning works very well even with somewhat longer IR commands than other remotes can handle in it's price range and you can take advantage of this to have it learn two buttons onto one. For a more updated button layout like you might have on your DVR remote, the One For All may be better.
The URC remotes are generally a very good value for less than $100. They introduce serious macro and learning capabilities with very minimal limitation. They also have models with built-in RF capabilities and screens. An alternative to URC is the Harmony remotes by Logitech, but you generally won't get as much in the learning/macro department for the money.
Anyway, now you have a launching point to start your own search for your perfect remote. As you gain more familiarity with advanced remotes, you may consider delving into advanced topics like JP1 remotes and hex IR code programming. Good luck.
Thursday, January 13, 2011
HOWTO: Free VOIP On An Android Phone
THERE IS A NEWER/BETTER WAY TO DO THIS DOCUMENTED HERE. It does reference some of the material below though since some steps are unchanged.
FOR FREE HOME PHONE (best quality/reliability) HOWTO USING ONLY GOOGLE + ASTERISK + ATA, LOOK HERE.
Recently I wanted to replace my work cell phone with a good voice over IP (VOIP) solution that would work on my regular personal cell phone. I work from home, so I have plenty of bandwidth through my wireless router (though it can work fine on 3G or better), and I don't like having to juggle multiple cell phones.
The solution I will provide you takes some fairly involved setup, but the end result is totally free incoming and outgoing calls which work fairly seamlessly on your Android smart phone. This solution will let you talk up to 2000 minutes per month for no charge.
Required Tools:
Google Voice Account
PBXes.org Account
ipkall Account
SIPDroid Android App
Google Voice Callback Android App
1.Set up PBXes
Sign up for an account. Then go to add extension and click SIP. Pick any extension number you desire. You can come back later to set up voicemail how you want.

Next, go to ring groups and create one for your extension (the number you used in the last step).

The final step in PBX setup is to configure the inbound route. The trunk is your pbx account username and extension number separated by a hyphen.


Note that PBXes free accounts are limited to 2000 minutes per month.
2. IPKALL setup
Ipkall provides a real telephone number where people can reach you. This is free for you because IPKALL makes money off termination charges from incoming calls. The numbers are based in various Washington state area codes. Use the password from the pbxes sip extension information.

Make sure you enter the same info you used as the trunk name in the inbound route screen. Pick any area code you like. After you submit and they approve it, you will get your new phone number via e-mail.
3.Set Up SIPDroid
SIPDroid is free and works great with pbxes. I am sure there are other SIP clients for Android which are quite good as well.
Menu -> Settings -> SIP Account:
username: username-200
password: password
server or proxy: pbxes.org
Note the username and password are the same as those used for ipkall. Other settings can be left at default.
You will also want to set the preferred call type to "Phone" in Menu -> Settings -> Call Options -> Preferred Call Type. Otherwise your phone will try to use the SIP account to whenever you dial any number which won't work.
You may want to examine other settings to control how SIPDroid works depending on your data connection (wifi vs 3G), which audio codecs to use, etc. If everything is working, SIPDroid will show a green dot in your status bar.
Now you are all set up to receive incoming calls, and you could stop here if that was all you wanted to do. However, I assume most of you will want to call out. If so, read on.
4.Configure Google Voice
Google voice is needed for outbound calling. You have set up everything for inbound calling from that IPKALL number, but you have no way to place calls. Google voice can do a web dial where it calls your ipkall number and then connects to the party you are trying to reach. This sounds like a PITA, but it is quite transparent once set up.
Sign up for google voice, and get a google voice phone number. Then go to settings -> voice settings -> add a new phone. Now enter your ipkall number (instead of 555-5555).

When you click save, a box will pop up for verifying your phone number. It will contain a two digit code in a text box which you have to enter when google voice calls you. If you are lucky, you won't have trouble using the dialer on SIPDroid to enter the code. I was not so lucky, but I have had problems even on a real cell phone when trying to verify google voice. The workaround is to put the phone on speakerphone mode and hold the mic up to your computer speaker where you play the appropriate tones. You can go to this site to generate the tones into a sound file to play back, and this worked for me. If you have no luck, cancel out of the verification pop up and then try saving again with another code. Some people had luck holding a house phone up to the mic to generate the tones. In any event, once it is done the number will be saved.
Now you can test everything out by clicking call and initiating a phone call on the google voice web interface (from a computer). Obviously this isn't very practical since you can only initiate calls from the site. If you aren't using the google voice app, don't bother installing it just for dialing. It can initiate a web dial (like we just did), but it is only set up to work for incoming calls on your normal cell line and will fail if you are connecting with SIPDroid. Luckily, an independent developer has made a very nice app that does just what we need called Google Voice Callback.
5.Google Voice Callback (please get the paid version if you like it)
After you get this Android app, it is pretty easy to set up.
1.Enter your google voice login information (or the app can obtain it from your google account info entered in the phone already).
2.Choose your ipkall number as your callback number.
3.This app will allow you to customize which calls should initiate a GV web dial to your SIP client instead of a normal call. You can set all, none, or custom filter rules.
For me, I only wanted numbers starting with a certain area code to be dialed through SIPDroid. So under the custom filter rules, I set a default action of "Do not use GV" and added a rule called "555" with action include and pattern 555*. When I call out using the normal phone dialer, it will call normally or trigger a VOIP call when I call a 555 number. This is all fairly seamless, and the only difference you will notice from a regular call is a little pop up while this app logs into google voice and initiates the call for a few seconds. After that, your sip client will ring and you can enjoy your free SIP calls.
You can also set all US numbers, specific phone numbers, or ask on certain numbers. Have fun.
FOR FREE HOME PHONE (best quality/reliability) HOWTO USING ONLY GOOGLE + ASTERISK + ATA, LOOK HERE.
Recently I wanted to replace my work cell phone with a good voice over IP (VOIP) solution that would work on my regular personal cell phone. I work from home, so I have plenty of bandwidth through my wireless router (though it can work fine on 3G or better), and I don't like having to juggle multiple cell phones.
The solution I will provide you takes some fairly involved setup, but the end result is totally free incoming and outgoing calls which work fairly seamlessly on your Android smart phone. This solution will let you talk up to 2000 minutes per month for no charge.
Required Tools:
Google Voice Account
PBXes.org Account
ipkall Account
SIPDroid Android App
Google Voice Callback Android App
1.Set up PBXes
Sign up for an account. Then go to add extension and click SIP. Pick any extension number you desire. You can come back later to set up voicemail how you want.

Next, go to ring groups and create one for your extension (the number you used in the last step).

The final step in PBX setup is to configure the inbound route. The trunk is your pbx account username and extension number separated by a hyphen.

I chopped out some unnecessary stuff here.

Note that PBXes free accounts are limited to 2000 minutes per month.
2. IPKALL setup
Ipkall provides a real telephone number where people can reach you. This is free for you because IPKALL makes money off termination charges from incoming calls. The numbers are based in various Washington state area codes. Use the password from the pbxes sip extension information.

Make sure you enter the same info you used as the trunk name in the inbound route screen. Pick any area code you like. After you submit and they approve it, you will get your new phone number via e-mail.
3.Set Up SIPDroid
SIPDroid is free and works great with pbxes. I am sure there are other SIP clients for Android which are quite good as well.
Menu -> Settings -> SIP Account:
username: username-200
password: password
server or proxy: pbxes.org
Note the username and password are the same as those used for ipkall. Other settings can be left at default.
You will also want to set the preferred call type to "Phone" in Menu -> Settings -> Call Options -> Preferred Call Type. Otherwise your phone will try to use the SIP account to whenever you dial any number which won't work.
You may want to examine other settings to control how SIPDroid works depending on your data connection (wifi vs 3G), which audio codecs to use, etc. If everything is working, SIPDroid will show a green dot in your status bar.
Now you are all set up to receive incoming calls, and you could stop here if that was all you wanted to do. However, I assume most of you will want to call out. If so, read on.
4.Configure Google Voice
Google voice is needed for outbound calling. You have set up everything for inbound calling from that IPKALL number, but you have no way to place calls. Google voice can do a web dial where it calls your ipkall number and then connects to the party you are trying to reach. This sounds like a PITA, but it is quite transparent once set up.
Sign up for google voice, and get a google voice phone number. Then go to settings -> voice settings -> add a new phone. Now enter your ipkall number (instead of 555-5555).

When you click save, a box will pop up for verifying your phone number. It will contain a two digit code in a text box which you have to enter when google voice calls you. If you are lucky, you won't have trouble using the dialer on SIPDroid to enter the code. I was not so lucky, but I have had problems even on a real cell phone when trying to verify google voice. The workaround is to put the phone on speakerphone mode and hold the mic up to your computer speaker where you play the appropriate tones. You can go to this site to generate the tones into a sound file to play back, and this worked for me. If you have no luck, cancel out of the verification pop up and then try saving again with another code. Some people had luck holding a house phone up to the mic to generate the tones. In any event, once it is done the number will be saved.
Now you can test everything out by clicking call and initiating a phone call on the google voice web interface (from a computer). Obviously this isn't very practical since you can only initiate calls from the site. If you aren't using the google voice app, don't bother installing it just for dialing. It can initiate a web dial (like we just did), but it is only set up to work for incoming calls on your normal cell line and will fail if you are connecting with SIPDroid. Luckily, an independent developer has made a very nice app that does just what we need called Google Voice Callback.
5.Google Voice Callback (please get the paid version if you like it)
After you get this Android app, it is pretty easy to set up.
1.Enter your google voice login information (or the app can obtain it from your google account info entered in the phone already).
2.Choose your ipkall number as your callback number.
3.This app will allow you to customize which calls should initiate a GV web dial to your SIP client instead of a normal call. You can set all, none, or custom filter rules.
For me, I only wanted numbers starting with a certain area code to be dialed through SIPDroid. So under the custom filter rules, I set a default action of "Do not use GV" and added a rule called "555" with action include and pattern 555*. When I call out using the normal phone dialer, it will call normally or trigger a VOIP call when I call a 555 number. This is all fairly seamless, and the only difference you will notice from a regular call is a little pop up while this app logs into google voice and initiates the call for a few seconds. After that, your sip client will ring and you can enjoy your free SIP calls.
You can also set all US numbers, specific phone numbers, or ask on certain numbers. Have fun.
Subscribe to:
Posts (Atom)

